Digest of Fluent Python
Part I - Prologue
Chapter 1 - The Python Data Model
This chapter focus on special methods, i.e. dunder methods。
| code | interpreted as | comment | |
|---|---|---|---|
f = Foo(arg) |
f = Foo.__new__(arg).__init__(arg) |
||
obj[key] |
obj.__getitem__(key) |
||
obj.foo / getattr(obj, "foo") |
obj.__getattribute__("foo") |
||
len(obj) |
obj.__len__(key) |
||
if x in obj: |
if obj.__contains__(x): |
If __contains__() is not available, Python will scan with __getitem__(). |
|
for x in obj: |
iterator = obj.__iter__() is implicitly called at the start of loops; x = iterator.__next__() is the next value and is implicitly called at each loop increment. |
If neither is available, Python will scan with __getitem__(). |
|
o1 + o2 |
o1.__add__(o2) |
||
o1 += o2 |
o1.__iadd__(o2) |
“in-place addition”. If __iadd__() is not implemented, += falls back to calling __add__() |
|
abs(obj) |
obj.__abs__() |
||
obj * 3 |
obj.__mul__(3) |
||
if obj: |
if obj.__bool__(): |
If __bool__() is not implemented, Python tries to invoke __len__(), and if $>0$, returns False. Otherwise True. |
|
repr(obj) |
obj.__rper__() |
"%s" % obj will call repr(obj). |
|
str(obj) |
obj.__str__() |
print(obj), "%s" % obj and "{}".format(obj) will call str(obj); if __str__ is not available, will fall back to __repr__(). |
__new__(cls, arg) / __init__(self, arg)
We often refer to __init__ as the constructor method, but that’s because we adopted jargon from other languages. The special method that actually constructs an instance is __new__:
- it’s a class method (but gets special treatment, so the
@classmethoddecorator is not used) and - it must return an instance.
If __new__() returns an instance of cls, that instance will in turn be passed as the first argument self of __init__ and the remaining arguments are the same as were passed to __new__().
If __new__() does not return an instance of cls, then the new instance’s __init__() method will not be invoked.
# pseudo-code for object construction
def object_maker(the_class, some_arg):
	new_object = the_class.__new__(some_arg)
	if isinstance(new_object, the_class):
		the_class.__init__(new_object, some_arg)
	return new_object

# the following statements are roughly equivalent
x = Foo('bar')
x = object_maker(Foo, 'bar')
__new__() is intended mainly to allow subclasses of immutable types (like int, str, or tuple) to customize instance creation. It is also commonly overridden in custom metaclasses in order to customize class creation.
__getitem__()
We say “__getitem__ method delegates to [] operator”. And once the delegation is implemented, slicing, if-in boolean operation, for-in iteration, and random.choice() on the object is automatically supported.
from random import choice


class MyList:
    def __init__(self, *args):
        self.inner_list = list(args)

    def __len__(self):
        print("__len__ is being called...")
        return len(self.inner_list)

    def __getitem__(self, position):
        print("__getitem__ at position {}...".format(position))
        return self.inner_list[position]


if __name__ == '__main__':
    ml = MyList(50, 60, 70, 80)

    print(len(ml))  # 4

    print(ml[0])  # 50
    print(ml[-1])  # 80
    print(ml[0:2])  # [50, 60]

    for i in ml:
        print i

    print(40 in ml)  # False

    print(choice(ml))  # randomly pick an element
__getattribute__() / __getattr__() / getattr()
obj[key] == obj.__getitem__(key)obj.foo == obj.__getattribute__("foo")(Note the quote marks)
__getattr__() does not delegates to . operator for attribute accessing, but is called when an attribute lookup FAILS (What a misleading function name!).
getattr() is a built-in function, whose logic is like:
def getattr(obj, name[, default]):
	try:
		return obj.__getattribute__(name)
	except AttributeError as ae:
		if default is passed:
			return default
		else:
			raise ae
Of course you can implement a similar mechanism of default values in __getattr__(), e.g. for all obj.xxx where xxx is not an attribute of obj, log this call.
Note that attributes can be functions, so it is possible to write getattr(obj, func_name)(param).
You may not want to override __getattribute__() yourself but if you somehow got a chance, pay attention to possible infinite loops caused by any form of self.xxx inside the implementation of __getattribute__(). Instead use base class method with the same name to access xxx, for example, object.__getattribute__(self, "xxx"). E.g.
class C(object):
    def __init__(self):
        self.x = 100

    def __getattribute__(self, name):
        # Wrong! AttributeError
        # return self.__dict__[name]

        # OK! Calling base class's __getattribute__()
        return object.__getattribute__(self, name)

        # OK! Calling C's overridden version of __getattribute__()
        # return super().__getattribute__(name)
__iter__() and __next__()
You can treat your own object as an iterator, so obj.__iter__() can return self and a __next__() implementation can be put inside your own object.
__repr__() vs __str__()
The string returned by __repr__() should be unambiguous and, if possible, match the source code necessary to re-create the object being represented. I.e. if possible, we would have
b = eval(repr(a))
assert a == b
A recommended way of implementing __repr__ is to return a string of a constructor call:
class BetterClass(object):
    def __init__(self, x, y):
		...

	def __repr__(self):
        return "BetterClass(%d,	%d)" % (self.x, self.y)
__str__() should return a string suitable for display to end users.
If you only implement one of these special methods, choose __repr__(), because when no custom __str__() is available, Python will call __repr__() as a fallback.
Part II - Data Structures
Chapter 2 - An array of Sequences
2.1 Overview of Built-In Sequences
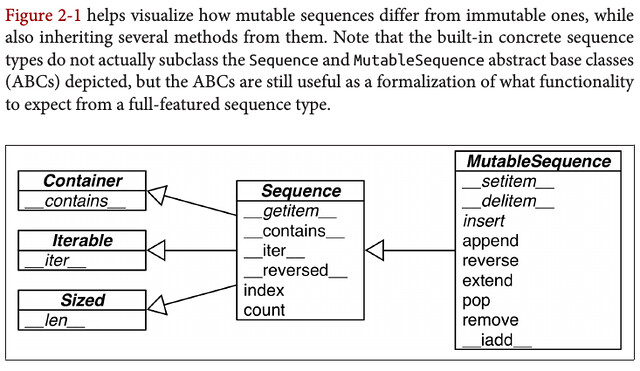
Python inherited from ABC the uniform handling of sequences. Strings, lists, byte sequences, arrays, XML elements, and database results share a rich set of common operations including iteration, slicing, sorting, and concatenation.
Group sequence types by element types:
- Container Sequences:
list,tuple, andcollections.dequecan hold items of different types.
- Flat Sequences:
str,bytes,bytearray,memoryview, andarray.arrayhold items of one type.
Container sequences hold references to the objects they contain, which may be of any type, while flat sequences physically store the value of each item within its own memory space, and not as distinct objects. Thus, flat sequences are more compact, but they are limited to holding primitive values like characters, bytes, and numbers.
Group sequence types by mutability:
- Mutable Sequences
list,bytearray,array.array,collections.deque, andmemoryview
- Immutable Sequences
tuple,str, andbytes
2.2 listcomps and genexps
my_list = [x**2 for x in range(0, 10)]  # list comprehension
my_tuple = tuple(x**2 for x in range(0, 10))  # generator expression

import array
# Both OK; "I" for unsigned int. See https://docs.python.org/3/library/array.html
my_array_1 = array.array("I", (i**2 for i in range(0, 10)))  # generator expression
my_array_2 = array.array("I", [i**2 for i in range(0, 10)])  # list comprehension
N.B. my_tuple above is not a good example of generator because actually (x**2 for x in range(0, 10)) is indeed a generator expression and returns a generator. The code of my_tuple above is not equal to:
my_gen = (x**2 for x in range(0, 10))  # OK. my_gen is a generator object

my_tuple = tuple(my_gen)  # OK, but my_tuple == ()
my_tuple = tuple(*my_gen)  # Syntax Error
so tuple(x**2 for x in range(0, 10)) is actually a special constructor of tuple. You cannot construct a tuple from a generator object manually.
To better understand generators, please read:
- nvie: Iterables vs. Iterators vs. Generators
- PEP 255 – Simple Generators
- stack overflow: Understanding Generators in Python
2.3 Tuples Are Not Just Immutable Lists
2.3.1 Tuples as Records
point_a = (-1, 1)
point_b = (2, 3)
2.3.2 Tuple Unpacking
point_a = (-1, 1)
x_a, y_a = point_a

print(x_a)  # -1
print(y_a)  # 1
An elegant application of tuple unpacking is swapping the values of variables without using a temporary variable:
b, a = a, b
2.3.3 Nested Tuple Unpacking
top_left, top_right, bottom_left, bottom_right = (0, 1), (1, 1), (0, 0), (1, 0)
square = (top_left, top_right, bottom_left, bottom_right)
(top_left_x, top_left_y), (top_right_x, top_right_y) = square[0:2]
Note that: square[0:2] == ((0, 1), (1, 1)) while square[0] == (0, 1) not ((0, 1)). In fact, python will evaluate ((0, 1)) as (0, 1).
2.3.4 namedtuple
The collections.namedtuple(typename, field_names) is a factory function that produces subclasses of tuple named typename and enhanced with accessibility via field_names.
一般的用法是:
import collections

Point = namedtuple('Point', ['x', 'y'])
p_a = Point(0, 1)

print(p_a.x)	# 0
print(p_a[1])	# 1
为啥要 typename = namedtuple(typename, ...)?这是因为这个 “subclasses of tuple named typename” 是在它 constructor 内部的一个临时 namespace 创建的 (通过 exec),然后这个 subclass typename 的实体会被 constructor 返回,但是它的 name–也就也是 typename–并不会随着 return 被带到 constructor 所在的 namespace。我们在外部再赋值一下,主要是为了保持一致,使得这个 subclass 的 name 不管是在它创建的临时 namespace 里还是当前的 namespace 里都叫 typename,避免产生不必要的误解。当然,你写成 Bar = namedtuple('Foo', ...) 是合法的,是没有问题的。
更多内容可以参见:
- How namedtuple works in Python 2.7
- Breakdown: collections.namedtuple
- Be careful with exec and eval in Python
- Python collections source code
2.4 Slicing
在 2.1 我们讲过,所有的 sequence type 都支持 “iteration, slicing, sorting, and concatenation”。
To evaluate the expression seq[start:stop:step], Python calls seq[slice(start, stop, step)] then seq.__getitem__(slice(start, stop, step)). (因为 1. 里有讲 __getitem__ method delegates to [] operator)
start 默认是 0;stop 默认是 len(seq) (exclusively);step 默认是 1,而且它是连冒号也可以省略的。E.g.
s = 'bicycle's[:2] == s[0:2] == s[:2:] == s[0:2:] == s[:2:1] == s[0:2:1] == 'bi's[2:] == ... == 'cycle's[::2] == bcce
Instead of filling your code with hardcoded slices, you can name them. 比如一个固定格式的 invoice 字符串,它的 price、description 什么的都是定长的,我们可以这样:
price = slice(start1, stop1, [step1])
desc = slice(start2, stop2, [step2])

for invoice in invoice_list:
	print(invoice[price], invoice[desc])
对于取下来的 sequence slice,我们可以直接用赋值来修改这个 sequence slice 进而直接修改 sequence 的值。这进一步说明:sequence slice 其实是 reference。E.g.
>>> l = list(range(10))
>>> l
[0, 1, 2, 3, 4, 5, 6, 7, 8, 9]
>>> l[2:5] = [20, 30]
>>> l
[0, 1, 20, 30, 5, 6, 7, 8, 9]
>>> del l[5:7]
>>> l
[0, 1, 20, 30, 5, 8, 9]
>>> l[3::2] = [11, 22]
>>> l
[0, 1, 20, 11, 5, 22, 9]
>>> l[2:5] = 100
Traceback (most recent call last):
File "<stdin>", line 1, in <module>
TypeError: can only assign an iterable
>>> l[2:5] = [100]
>>> l
[0, 1, 100, 22, 9]
When the target of the assignment is a slice, the right side must be an iterable object, even if it has just one item.
Digress: The [] operator can also take multiple indexes or slices separated by commas. This is used, for instance, in the external NumPy package, where items of a two-dimensional numpy.ndarray can be fetched using the syntax a[i, j] and a two-dimensional slice obtained with an expression like a[m:n, k:l]. 实现上,它们的 __getitem__() 和 __setitem__() 是接收 tuple 的,比如 to evaluate a[i, j], Python calls a.__getitem__((i, j)).
Digress: The Ellipsis object–written as three full stops (...)–is the single instance of the ellipsis class. NumPy uses ... as a shortcut when slicing arrays of many dimensions; for example, if x is a fourdimensional array, x[i, ...] is a shortcut for x[i, :, :, :,].
2.5 Using + and * with Sequences
Beware of expressions like a * n when a is a sequence containing mutable items. E.g. my_list = [[]] * 3 will result in a list with three references to the same inner list.
创建一个预分配长度为 5 的 list 我们可以用 lst = [None] * 5。那么现在我要一个 [lst, lst, lst] 的 list of lists 该怎么办?
llst = [[None] * 5 for _ in range(3)]  # Right
lref = [[None] * 5] * 3  # Legal but this is a list of 3 references to one list of 5
鉴定是 list of lists 还是 list of references 可以用 id() 方法,类似 java 的 hashcode。
In [3]: for lst in llst:
   ...:     print(id(lst))
   ...:
2343147973832
2343148089224
2343148087880

In [5]: for lst in lref:
   ...:     print(id(lst))
   ...:
2343148276680
2343148276680
2343148276680
2.6 lst.sort() vs sorted(lst)
lst.sort()sorts in place—that is, without making a copy oflst.- A drawback: cannot cascade calls to other methods.
sorted(lst)creates a new list and returns it.lstdoes not change.
这两个方法的参数都是一样的:
reverse: booleankey: the function that will be applied to items to generate the sorting key.- 默认是 identity function,相当于是
key = lambda x:x,直接比较 item 本身 - 比如
key = str.lowermeans sorting case-insensitively - 比如
key = lenmeans sorting by the length of each item - 比如
key = intmeans sorting by values ofint(item)
- 默认是 identity function,相当于是
2.7 Managing Ordered Sequences with bisect Module
bisection 中文意思就是 “二分法”。
bisect.bisect(haystack, needle) does a binary search for needle in haystack–which must be a sorted sequence–and returns the index where needle can be inserted while maintaining haystack in ascending order.
You could use the result of bisect.bisect(haystack, needle) as the index argument to haystack.insert(index, needle)–however, using bisect.insort(haystack, needle) does both steps, and is faster.
2.8 When a List Is Not the Answer
2.8.1 array.array
If the list will only contain numbers, an array.array is more efficient than a list.
When creating an array.array, you provide a typecode, a letter to determine the underlying C type used to store each item in the array.
- For example,
'b'is the typecode for signed char. If you create anarray('b'), then each item will be stored in a single byte and interpreted as an integer from –128 to 127. - For large sequences of numbers, this saves a lot of memory.
- E.g. an
array('f')does not holdfloatobjects but only the bytes representing the values.
- E.g. an
- And Python will not let you put any number that does not match the type for the array.
2.8.2 memoryview(array)
一个 array 可以有多种表示,比如二进制、八进制。memoryview 就是用来显示这些不同的表示的。如果修改 memoryview 自然会修改到底层的 array 的值。这进一步说明:sequence 是 mutable 的。
>>> numbers = array.array('h', [-2, -1, 0, 1, 2])  # 'h' for signed short
>>> memv = memoryview(numbers)
>>> memv_oct = memv.cast('B')  # 'B' for unsigned char
>>> memv_oct.tolist()
[254, 255, 255, 255, 0, 0, 1, 0, 2, 0]
2.8.3 collections.deque and Other Queues
collections.deque is a thread-safe double-ended queue designed for fast inserting and removing from both ends.
Chapter 3 - Dictionaries and Sets
Digress: What Is Hashable?
An object is hashable if it has a hash value which never changes during its lifetime (it needs a __hash__() method), and can be compared to other objects (it needs an __eq__() method). Hashable objects which compare equal must have the same hash value.
- The atomic immutable types (str, bytes, numeric types) are all hashable.
- A
frozensetis always hashable, because its elements must be hashable by definition. - A
tupleis hashable only if all its items are hashable.- At the time of this writing, the Python Glossary states: “All of Python’s immutable built-in objects are hashable” but that is inaccurate because a tuple is immutable, yet it may contain references to unhashable objects.
>>> tt = (1, 2, (30, 40))
>>> hash(tt)
8027212646858338501
>>> tl = (1, 2, [30, 40])
>>> hash(tl)
Traceback (most recent call last):
File "<stdin>", line 1, in <module>
TypeError: unhashable type: 'list'
>>> tf = (1, 2, frozenset([30, 40]))
>>> hash(tf)
-4118419923444501110
User-defined types are hashable by default because their hash value is their id() and they all compare not equal.
3.1 Generic Mapping Types

In [6]: from collections import abc
In [7]: isinstance({}, abc.MutableMapping)
Out[7]: True
All mapping types in the standard library use the basic dict in their implementation, so they share the limitation that the keys must be hashable.
3.2 dictcomp
创建 dict 的语法真是多种多样……
>>> a = dict(one=1, two=2, three=3)
>>> b = {'one': 1, 'two': 2, 'three': 3}
>>> c = dict(zip(['one', 'two', 'three'], [1, 2, 3]))
>>> d = dict([('two', 2), ('one', 1), ('three', 3)])
>>> e = dict({'three': 3, 'one': 1, 'two': 2})
>>> a == b == c == d == e
True
In addition to the literal syntax and the flexible dict constructor, we can use dict comprehensions to build dictionaries.
>>> DIAL_CODES = [
... 	(86, 'China'),
... 	(91, 'India'),
... 	(1, 'United States'),
... 	(62, 'Indonesia'),
... 	(55, 'Brazil'),
... 	(92, 'Pakistan'),
... 	(880, 'Bangladesh'),
... 	(234, 'Nigeria'),
... 	(7, 'Russia'),
... 	(81, 'Japan'),
... ]
>>> country_code = {country: code for code, country in DIAL_CODES}
>>> country_code
{'China': 86, 'India': 91, 'Bangladesh': 880, 'United States': 1,
'Pakistan': 92, 'Japan': 81, 'Russia': 7, 'Brazil': 55, 'Nigeria':
234, 'Indonesia': 62}
>>> {code: country.upper() for country, code in country_code.items() if code < 66}
{1: 'UNITED STATES', 55: 'BRAZIL', 62: 'INDONESIA', 7: 'RUSSIA'}
3.3 Handling Missing Keys with dict.setdefault()
d.get(k, default) is an alternative to d[k] whenever a default value is more convenient than handling KeyError.
setdefault(key[, default]):
- If
keyis ind, returnd[key]. - If not, insert
d[key] = defaultand returndefault. defaultdefaults toNone.
与 list 可以组合成这么一个 combo:
d.setdefault(key, []).append(new_value)
- 如果
d[key]存在,就 append - 如果
d[key]不存在,就创建一个[]然后 append
3.4 Handling Missing Keys with collections.defaultdict or __missing__()
defaultdict(default_factory):
default_factoryis a callable that is used to produce a default value whenever__getitem__(key)is called with a nonexistentkey.- N.B only for
__getitem__()calls. Therefore ifddis adefaultdictandkeyis a missing key:dd[key]will return the default value created bydefault_factory()dd.get(k)will returnNone
Another way to handle missing keys is to extend a dict and implement the __missing__() method.
__missing__()is just called by__getitem__()
3.5 Variations of dict
collections.OrderedDict: Maintains keys in insertion order.collections.ChainMap(dict1, dict2):- 先在
dict1里查,有就 return;没有就继续去dict2里查。 dict1和dict2可以有相同的 key。- 查找的顺序只和构造器的参数顺序有关。
- 先在
collections.Counter: A mapping that holds an integer count for each key. Updating an existing key adds to its count.
3.6 Subclassing UserDict
UserDict is designed to be subclassed. It’s almost always easier to create a new mapping type by extending UserDict rather than dict.
Note that UserDict does not inherit from dict, but has an internal dict instance, called data, which holds the actual items.
- 组合优于继承 again!
- 所以
UserDict既不是一个 interface 也不是一个 abstract class,它是一个 Mixin
3.7 Immutable Mappings
The mapping types provided by the standard library are all mutable, but you may need to guarantee that a user cannot change a mapping by mistake.
Since Python 3.3, the types module provides a wrapper class called MappingProxyType, which, given a mapping, returns a mappingproxy instance that is a read-only but dynamic view of the original mapping. This means that updates to the original mapping can be seen in the instance, but changes cannot be made through it.
>>> from types import MappingProxyType
>>> d = {1: 'A'}
>>> d_proxy = MappingProxyType(d)
>>> d_proxy
mappingproxy({1: 'A'})
>>> d_proxy[1]
'A'
>>> d_proxy[2] = 'x'
Traceback (most recent call last):
File "<stdin>", line 1, in <module>
TypeError: 'mappingproxy' object does not support item assignment
>>> d[2] = 'B'
>>> d_proxy
mappingproxy({1: 'A', 2: 'B'})
>>> d_proxy[2]
'B'
3.8 set
setelements must be hashable.setitself is not hashable.frozensetis hashable, so you can havefrozensetinside aset
3.8.1 set Literals
s = {1, 2, 3}
- To create an empty set, you should use the constructor without an argument:
s = set(). - If you write
s = {}, you’re creating an emptydict.
3.8.2 setcomp
>>> from unicodedata import name
>>> {chr(i) for i in range(32, 256) if 'SIGN' in name(chr(i), '')}
{'§', '=', '¢', '#', '¤', '<', '¥', 'μ', '×', '$', '¶', '£', '©',
'°', '+', '÷', '±', '>', '¬', '®', '%'}
3.8.3 Set Operations

Given two sets a and b and an element e:
a & b: the intersection;a | b: the union;a - b: the difference!a < b: isaa proper subset ofb?a <= b: isaa subset ofb?a > b: isaa proper superset ofb?a >= b: isaa superset ofb?a.discard(e): removeefromaif it is presenta.remove(e): removeefroma, raisingKeyErrorifenot ina
3.9 dict and set Under the Hood
A hash table is a sparse array (i.e., an array that always has empty cells). In standard data structure texts, the cells in a hash table are often called “buckets.” In a dict hash table, there is a bucket for each item, and it contains two fields: a reference to the key and a reference to the value of the item. Because all buckets have the same size, access to an individual bucket is done by offset.
The hash() built-in function works directly with built-in types and falls back to calling __hash__() for user-defined types. If two objects compare equal, their hash values must also be equal. For example, because 1 == 1.0 is true, hash(1) == hash(1.0) must also be true, even though the internal representation of an int and a float are very different.
To fetch the value at my_dict[search_key], Python calls hash(search_key) to obtain the hash value of search_key and uses the least significant bits of that number as an offset to look up a bucket in the hash table (the number of bits used depends on the current size of the table). If the found bucket is empty, KeyError is raised. Otherwise, the found bucket has an item—a found_key:found_value pair—and then Python checks whether search_key == found_key. If they match, that was the item sought: found_value is returned.
However, if search_key and found_key do not match, this is a hash collision. In order to resolve the collision, the algorithm then takes different bits in the hash, massages them in a particular way, and uses the result as an offset to look up a different bucket. If that is empty, KeyError is raised; if not, either the keys match and the item value is returned, or the collision resolution process is repeated.

The process to insert or update an item is the same, except that when an empty bucket is located, the new item is put there, and when a bucket with a matching key is found, the value in that bucket is overwritten with the new value.
Additionally, when inserting items, Python may determine that the hash table is too crowded and rebuild it to a new location with more room. As the hash table grows, so does the number of hash bits used as bucket offsets, and this keeps the rate of collisions low.
dicts have significant memory overhead
Because a dict uses a hash table internally, and hash tables must be sparse to work, they are not space efficient. For example, if you are handling a large quantity of records, it makes sense to store them in a list of tuples or named tuples instead.
But remember:
Optimization is the altar where maintainability is sacrificed.
Key search is very fast
The dict implementation is an example of trading space for time: dictionaries have significant memory overhead, but they provide fast access regardless of the size of the dictionary–as long as it fits in memory.
Adding items to a dict may change the order of existing keys
Whenever you add a new item to a dict, the Python interpreter may decide that the hash table of that dictionary needs to grow. This entails building a new, bigger hash table, and adding all current items to the new table. During this process, new (but different) hash collisions may happen, with the result that the keys are likely to be ordered differently in the new hash table. All of this is implementation-dependent, so you cannot reliably predict when it will happen. If you are iterating over the dictionary keys and changing them at the same time, your loop may not scan all the items as expected.
This is why modifying the contents of a dict while iterating through it is a bad idea. If you need to scan and add items to a dictionary, do it in two steps: read the dict from start to finish and collect the needed additions in a second dict. Then update the first one with it.
How Sets Work
The set and frozenset types are also implemented with a hash table, except that each bucket holds only a reference to the element.
The underlying hash table determines the behavior of a dict applies to a set. Without repeating the previous section, we can summarize it for sets with just a few words:
setelements must be hashable objects.sets have a significant memory overhead.- Membership testing is very efficient.
- Adding elements to a
setmay change the order of other elements.
Chapter 4 - Text vs Bytes
4.1 Character Issues
The Unicode standard explicitly separates the identity of characters from specific byte representations. 我们来学习一下相关的词汇:
- code point: the identity of a character. 也就是我们所谓的 “Unicode 编码”,比如 “A” 的 code point 就是 “U+0041”
- code points $\rightarrow$ bytes 的过程我们称为 encoding;
- bytes $\rightarrow$ code points 的过程我们称为 decoding;
- encode 可以理解为 “编成机器码”,byte 也是一种码嘛~
- 但同时 encoding 这个词也可以表示这一套编解码的规则:An encoding is an algorithm that converts code points to byte sequences and vice versa.
- codec 是 coder-decoder 的简称,co(der)-dec(oder)
- 我们也可以理解为一套 encoding 规则对应一个 codec
- code page 则是一张 $\operatorname{f}: \text{code point} \rightarrow \text{byte}$ 的 lookup table
>>> s = 'café'
>>> b = s.encode('utf8')  # Encode `str` to `bytes` using UTF-8 encoding.
>>> b
b'caf\xc3\xa9' # `bytes` literals start with a `b` prefix.
>>> b.decode('utf8')  # Decode `bytes` to `str` using UTF-8 encoding.
'café'
Digress: BOM
BOM stands for byte-order mark.
The UTF-8 BOM is a sequence of bytes that allows the reader to identify a file as being encoded in UTF-8.
Normally, the BOM is used to signal the endianness of an encoding, but since endianness is irrelevant to UTF-8, the BOM is unnecessary.
| BOM Bytes | Encoding Form |
|---|---|
| “00 00 FE FF” | UTF-32, big-endian |
| “FF FE 00 00” | UTF-32, little-endian |
| “FE FF” | UTF-16, big-endian |
| “FF FE” | UTF-16, little-endian |
| “EF BB BF” | UTF-8 |
4.2 Byte Essentials
The new binary sequence types are unlike the Python 2 str in many regards. The first thing to know is that there are two basic built-in types for binary sequences: the immutable bytes type introduced in Python 3 and the mutable bytearray, added in Python 2.6. (Python 2.6 also introduced bytes, but it’s just an alias to the str type, and does not behave like the Python 3 bytes type.)
Each item in bytes or bytearray is an integer from 0 to 255, and not a one-character string like in the Python 2 str.
my_bytes[0]retrieves an intmy_bytes[:1]returns a bytes object of length 1 (i.e. always a sequence)- however,
my_str[0] == my_str[:1]
4.3 Basic Encoders/Decoders
Each codec has a name, like ‘utf_8’, and often aliases, such as ‘utf8’, ‘utf-8’, and ‘U8’. 其他常见的 codec 还有:
- ‘latin1’ a.k.a. ‘iso8859_1’
- ‘cp1252’
- ‘cp437’
- ‘gb2312’
- ‘utf-16le’
4.4 Understanding Encode/Decode Problems (略)
4.5 Handling Text Files
If the encoding argument was omitted when opening the file to write, the locale default encoding would be used. Always pass an explicit encoding= argument when opening text files.
- On GNU/Linux and OSX all of these encodings are set to UTF-8 by default, and have been for several years.
- On Windows, not only are different encodings used in the same system, but they are usually codepages like ‘cp850’ or ‘cp1252’ that support only ASCII with 127 additional characters that are not the same from one encoding to the other.
4.6 Normalizing Unicode for Saner Comparisons (略)
4.7 Sorting Unicode Text (略)
4.8 The Unicode Database (略)
4.9 Dual-Mode str and bytes APIs (略)
Part III - Functions as Objects
Chapter 5 - Python Functions are First-Class Objects
Programming language theorists define a “first-class object” as a program entity that can be:
- Created at runtime
- Assigned to a variable or element in a data structure
- Passed as an argument to a function
- Returned as the result of a function
Integers, strings, and dictionaries are other examples of first-class objects in Python.
5.1 Treating a Function Like an Object
>>> def factorial(n):
... '''returns n!'''
... return 1 if n < 2 else n * factorial(n-1)
...
>>> factorial.__doc__
'returns n!'
>>> type(factorial)
<class 'function'>
>>> help(factorial)
Help on function factorial in module __main__:

factorial(n)
    returns n!
>>> fact = factorial
>>> list(map(fact, range(11)))
[1, 1, 2, 6, 24, 120, 720, 5040, 40320, 362880, 3628800]
map(func, iterable)returns an generator (anmapobject) where each item is the result offunc(e)whereeis an element ofiterable- Actually less than a listcomp here:
list(map(fact, range(11))) == [fact(x) for x in range(11)]list(map(None, iter_a, iter_b)) == [(a,b) for a in iter_a for b in iter_b]
简单说 map 就是:
def map(func, iterable):
    for i in iterable:
        yield func(i)
5.2 Higher-Order Functions (e.g. map, filter and reduce)
A function that takes a function as argument or returns a function as the result is a higher-order function. E.g. map, filter and reduce.
applywas deprecated in Python 2.3 and removed in Python 3.apply(fn, args, kwargs) == fn(*args, **kwargs)
简单说 filter 就是:
def filter(func, iterable):
	for i in iterable:
		if func(i):
			yield i
E.g. list(filter(lambda x: x % 2, range(11))) == [x for x in range(11) if x % 2] == [1,3,5,7,9].
而 reduce(func, iterable) 的作用是:apply two-argument function func cumulatively to the items of iterable, so as to reduce the iterable to a single value.
def reduce(function, iterable, initializer=None):
    it = iter(iterable)
    if initializer is None:
        try:
            initializer = next(it)
        except StopIteration:
            raise TypeError('reduce() of empty sequence with no initial value')
    accum_value = initializer
    for x in it:
        accum_value = function(accum_value, x)
    return accum_value
E.g.
from functools import reduce
from operator import add

reduce(add, [1,2,3,4,5])  # == (((1+2)+3)+4)+5 == 15
If seq=[s1, s2, s3, ... , sn], calling reduce(func, seq) works like this:
- At first the first two elements of
seqwill be applied tofunc, i.e.func(s1, s2). The list on whichreduce()works looks now like this:[func(s1, s2), s3, ..., sn] - In the next step
funcwill be applied on the previous result and the third element of the list, i.e.func(func(s1, s2), s3). The list looks like this now:[func(func(s1, s2),s3), s4, ..., sn] - Continue like this until just one element is left and return this element as the result of
reduce()
P.S. Other reducing built-ins are all and any:
all(iterable)- Returns
Trueif every element of theiterableis truthy; all([])returnsTrue.
- Returns
any(iterable)- Returns
Trueif any element of theiterableis truthy; any([])returnsFalse.
- Returns
5.3 Anonymous Functions
The lambda keyword creates an anonymous function within a Python expression.
The body of lambda functions must be pure expressions. In other words, the body of a lambda cannot make assignments or use any other Python statement such as while, try, etc.
5.4 The 7 Flavors of Callable Objects
() in func() can be called a “call opertor”. To determine whether an object is callable, use the callable() built-in function.
- User-defined functions. E.g. created with
deforlambda. - User-defined methods.
- Built-in functions. Functions implemented in C (for CPython), like
len. - Built-in methods. Methods implemented in C (for CPython), like
dict.get. - Class instructors. When invoked, a class runs its
__new__method to create an instance, then__init__to initialize it, and finally the instance is returned to the caller. Because there is nonewoperator in Python, calling a class is like calling a function. - Callable class instances. If a class implements a
__call__method, then its instances can be invoked as functions. - Generators. Functions or methods that use
yield.
5.5 User-Defined Callable Types
A class implementing __call__ is an easy way to create functions that have some internal state that must be kept across invocations. 注意这句其实说的就是:在某些需要 function 的场合,我们可以用 callable class instance 来代替 function,从而可以给这个 “function” 一些 state 来实现更多的功能。原文说的是 “…to create function-like objects that…“,不知道为何要这么拐弯抹角的表示……E.g. decorators must be functions, 但比如你要做一个 cache decorator,这时就需要将这个 decorator 用 callable class instance 来实现,把 cache 封装到 class 内部。
A totally different approach to creating functions with internal state is to use closures. Closures, as well as decorators, are the subject of Chapter 7.
5.6 Function Introspection
General way to introspect an object:
dir(obj): returns a list of valid attributes for that objectobj.__dict__: stores all the user attributes assigned to that object
Exclusive way to introspect a user-defined function:
func.__annotations__: a dict; the parameter and return annotations- 注意 annotation 不同于 docstring (
'''blah blah''') which is stored infunc.__doc__
- 注意 annotation 不同于 docstring (
func.__closure__: a tuple of closure cells; the function closure, i.e. bindings for free variables (one cell for each free variable)func.__code__: acodeobject; function metadata and function body compiled into bytecodefunc.__defaults__: a tuple of default values for the formal parametersfunc.__kwdefaults__: a dict of default values for the keyword-only formal parameters
Function Annotations
注意 python 的 annotation 不同于的 java 的 annotation;python 的 annotation 是为 documentation 服务的,最详细的说明在 PEP 3107 – Function Annotations。annotation 可以有两种形式:一是 string,二是 type,我们来看下规范:
def foo(a: "annotation for a" [= a_def_val]) -> "annotaton for returned value":
	pass

def bar(a: TypeA (= a_def_val)) -> ReturnType:
	pass
举个例子:
def foo(a: "this is parameter a") -> "return nothing":
	return None

>>> foo.__annotations__
>>> {'a': 'this is parameter a', 'return': 'return nothing'}

class ReturnType: pass
def bar(a: int = 1) -> ReturnType:
	pass

>>> bar.__annotations__
>>> {'a': int, 'return': __main__.ReturnType}
Function Closure
先看例子:
def print_msg(msg):
	'''This is the outer enclosing function'''

    def printer():
		'''This is the nested function'''
        print(msg)

    return printer

print_hello = print_msg("Hello")
print_hello()  # Output: Hello

>>> print_hello.__closure__
>>> (<cell at 0x000001B2408F6C78: str object at 0x000001B240A34110>,)

>>> inspect.getclosurevars(print_hello)
>>> ClosureVars(nonlocals={'msg': 'Hello'}, globals={}, builtins={'print': <built-in function print>}, unbound=set())
这里的 msg = 'Hello' 是 print_hello 的一个 free variable。我们先来看下 free variable 的定义:
- In mathematics:
- a free variable is a variable in an expression where substitution may take place.
- 也就是说,能做替换操作的 variable 都是 free variable
- a bound variable is a variable that was previously free, but has been bound to a specific value or set of values.
- E.g., the variable $x$ becomes a bound variable when we write:
- $\forall x, (x + 1)^2 = x^2 + 2x + 1$ or
- $\exists x \text{ such that } x^2 = 2$
- Some older books use the terms real variable and apparent variable for free variable and bound variable.
- E.g., the variable $x$ becomes a bound variable when we write:
- a free variable is a variable in an expression where substitution may take place.
- In computer programming:
- the term free variable refers to variables used in a function that are neither local variables nor parameters of that function.
- 这个场合下,bound variable 就不好定义了,也没有必要往这个方向去考虑。
所以在 python 这儿,如果 func.__closure__ 就是 closure 的话,那 closure 相当于被定义成了 free variable 的一个 enviroment 或者 namespace。我觉得这么理解其实挺好记的,非常直观 (毕竟你可以直接 print 到 console……)。
我对 closure 一直不理解是因为我看到了各种各样的定义,比如:
- “function + its free variables”, or the code snippet of “function + its free variables”
- The function object itself (i.e.
print_hellohere) - A phenomenon which happens when a function has access to a local variable from an enclosing scope.
这些统统没有 func.__closure__ 直观,所以暂且按 func.__closure__ 来记好了。若是以后对 closure 的理解出了偏差,还可以甩锅给 python 说它变量名起得不对 www
Default Parameter Values vs Default Keyword-Only Parameter Values
按 PEP 3102 – Keyword-Only Arguments 的说法,kwyword-only argument 是:
Arguments that can only be supplied by keyword and which will never be automatically filled in by a positional argument.
def func(a, b = 1, *args, kwa, kwb = 2):
	pass

>>> func.__defaults__
>>> (1,)

>>> func.__kwdefaults__
>>> {'kwb': 2}
从逻辑上,keyword-only parameter 是 parameter 的一种 (其实一共就两种,一个 positional 一个 keyword-only),但是上面这个例子里 __kwdefaults__.values $\not \subset$ __defaults__.
另外一个需要注意的问题是:default parameter value 只在 def 的被执行的时候初始化一次,而不是每次调用 function 的时候都初始化一次 (有点类似 static;Ruby 也是这样的)。比如下面这个例子:
def func2(b = [], *args, kwb = []):
	b.append('F')
	kwb.append('F')

	print("b == {}".format(b))
	print("kwb == {}".format(kwb))

for _ in range(3):
	func2()

// output:
/**
	b == ['F']
	kwb == ['F']
	b == ['F', 'F']
	kwb == ['F', 'F']
	b == ['F', 'F', 'F']
	kwb == ['F', 'F', 'F']
**/
所以如果你要每次调用 function 时都默认参数为 [],正确的写法应该是:
def func3(b = None):
	if b is None
		b = []
	......
当然这个特性也可以合理利用,比如你要做一个 cache,你当然不希望每次都初始化为默认的值。
注意这章一开始有说 Python functions are first-class objects,所以 default parameter value 也有点像 object 的 attribute。
5.7 Packages for Functional Programming: operator and functools
5.7.1 operator: arithmetic operators / itemgetter / attrgetter / methodcaller
Python does not aim to be a functional programming language, but a functional coding style can be used to good extent, thanks to the support of packages like operator and functools.
To save you the trouble of writing trivial anonymous functions like lambda a, b: a*b, the operator module provides function equivalents for dozens of arithmetic operators.
from functools import reduce
from operator import mul

def fact(n):  # lambda version
	return reduce(lambda a, b: a*b, range(1, n+1))

def fact(n):  # operator version
	return reduce(mul, range(1, n+1))
Another group of one-trick lambdas that operator replaces are functions to pick items from sequences or read attributes from objects: itemgetter and attrgetter actually build custom functions to do that.
- Essentially,
itemgetter(1)does the same aslambda fields: fields[1] - If you pass multiple index arguments to
itemgetter(), the function it builds will return tuples with the extracted values itemgetter()uses the[]operator–it supports not only sequences but also mappings and any class that implements__getitem__().
metro_data = [
	('Tokyo', 'JP', 36.933, (35.689722, 139.691667)),
	('Delhi NCR', 'IN', 21.935, (28.613889, 77.208889)),
	('Mexico City', 'MX', 20.142, (19.433333, -99.133333)),
	('New York-Newark', 'US', 20.104, (40.808611, -74.020386)),
	('Sao Paulo', 'BR', 19.649, (-23.547778, -46.635833)),
]

from operator import itemgetter

for city in sorted(metro_data, key=itemgetter(1)):
	print(city)

# Output:
"""
('Sao Paulo', 'BR', 19.649, (-23.547778, -46.635833))
('Delhi NCR', 'IN', 21.935, (28.613889, 77.208889))
('Tokyo', 'JP', 36.933, (35.689722, 139.691667))
('Mexico City', 'MX', 20.142, (19.433333, -99.133333))
('New York-Newark', 'US', 20.104, (40.808611, -74.020386))
"""

cc_name = itemgetter(1, 0)
for city in metro_data:
	"""
	注意 itemgetter(...) 等价于一个 lambda
	所以它本身是一个 function
	既然是 function 自然就可以 call
	(换言之 itemgetter 是一个 "return function 的 function")
	"""
	print(cc_name(city))

# Output:
"""
('JP', 'Tokyo')
('IN', 'Delhi NCR')
('MX', 'Mexico City')
('US', 'New York-Newark')
('BR', 'Sao Paulo')
"""
A sibling of itemgetter is attrgetter, which creates functions to extract object attributes by name.
- E.g.
attrgetter("__class__")("hello")return"hello".__class__(==<class 'str'>) - If you pass attrgetter several attribute names as arguments, it also returns a tuple of values.
- In addition, if any argument name contains a
.(dot), attrget ter navigates through nested objects to retrieve the attribute- E.g.
attrgetter('__class__.__name__')("hello")return"hello".__class__.__name__(=='str')
- E.g.
At last we cover methodcaller–the function it creates calls a method by name on the object given as argument:
from operator import methodcaller

s = 'The time has come'
upcase = methodcaller('upper')
upcase(s)

# 'THE TIME HAS COME'

hiphenate = methodcaller('replace', ' ', '-')
hiphenate(s)

# 'The-time-has-come'
总结一下:
def itemgetter(*keys):
    if len(keys) == 1:
        key = keys[0]
        return lambda x: x[key]
    else:
        return lambda x: tuple(x[key] for key in keys)

def attrgetter(*names):
    if any(not isinstance(name, str) for name in names):
        raise TypeError('attribute name must be a string')

	if len(names) == 1:
        name = names[0]
        return lambda x: x.__getattribute__(name)
    else:
        return lambda x: tuple(x.__getattribute__(name) for name in names)

def methodcaller(name, *args, **kwargs):
    return lambda x: getattr(x, name)(*args, **kwargs)
get_first_two_items = itemgetter(0, 1)
	# is equivalent to define
def get_first_two_items(x):
	return (x[0], x[1])

get_foo_and_bar = attrgetter("foo", "bar")
	# is equivalent to define
def get_foo_and_bar(x):
	return (x.foo, x.bar)

call_foo_with_bar_and_baz = methodcaller("foo", "bar", baz="baz")
call_foo_with_bar_and_baz(f)
	# is equivalent to call
f.foo("bar", baz="baz")
5.7.2 functools: Freezing Arguments with partial()
from operator import mul
from functools import partial

triple = partial(mul, 3)
triple(7)

# Output: 21
Chapter 6 - Design Patterns with First-Class Functions
6.1 Case Study: Refactoring Strategy
第一个例子,注意两点:
- package
abc名字的意思是 abstract base class…… - 写 empty function body 的两种方式:
pass- 连
pass都不用写,只留下 docstring
from abc import ABC, abstractmethod

class Order:
	def __init__(self, customer, cart, promotion=None):
		self.customer = customer
		self.cart = list(cart)
		self.promotion = promotion

	def due(self):
		if self.promotion is None:
			discount = 0
		else:
			discount = self.promotion.discount(self)
		return self.total() - discount

# In Python 3.4, the simplest way to declare an ABC is to subclass `abc.ABC`
class Promotion(ABC): # the Strategy: an abstract base class
	@abstractmethod
	def discount(self, order):
		"""Return discount as a positive dollar amount"""
		# pass

class FidelityPromo(Promotion): # first Concrete Strategy
	"""5% discount for customers with 1000 or more fidelity points"""
	def discount(self, order):
		return order.total() * .05 if order.customer.fidelity >= 1000 else 0

class BulkItemPromo(Promotion): # second Concrete Strategy
	"""10% discount for each LineItem with 20 or more units"""
	def discount(self, order):
		discount = 0
		for item in order.cart:
			if item.quantity >= 20:
				discount += item.total() * .1
		return discount

class LargeOrderPromo(Promotion): # third Concrete Strategy
	"""7% discount for orders with 10 or more distinct items"""
	def discount(self, order):
		distinct_items = {item.product for item in order.cart}
			if len(distinct_items) >= 10:
				return order.total() * .07
		return 0
Each concrete strategy above is a class with a single method, discount. Furthermore, the strategy instances have no state (no instance attributes). You could say they look a lot like plain functions, and you would be right. We can refactor this example to function-oriented:
class Order:
	def __init__(self, customer, cart, promotion=None):
		self.customer = customer
		self.cart = list(cart)
		self.promotion = promotion

	def due(self):
		if self.promotion is None:
			discount = 0
		else:
			discount = self.promotion(self)  # 精妙之处在此
		return self.total() - discount

def fidelity_promo(order):
	"""5% discount for customers with 1000 or more fidelity points"""
	return order.total() * .05 if order.customer.fidelity >= 1000 else 0

def bulk_item_promo(order):
	"""10% discount for each LineItem with 20 or more units"""
	discount = 0
	for item in order.cart:
		if item.quantity >= 20:
			discount += item.total() * .1
	return discount

def large_order_promo(order):
	"""7% discount for orders with 10 or more distinct items"""
	distinct_items = {item.product for item in order.cart}
	if len(distinct_items) >= 10:
		return order.total() * .07
	return 0
6.1.1 Flyweight Pattern
It is interesting to note that in Design Patterns the authors suggest: “Strategy objects often make good flyweights.” A definition of the Flyweight in another part of that work states:
A flyweight is a shared object that can be used in multiple contexts simultaneously.
- flyweight 本意是拳击比赛的 “轻量级”。
这个定义并没有很清楚,这篇 Flyweight 我觉得写得不错。给出的例子是 game programming 中的地图渲染的场景:
- 你有很多很多个
Treeobject 要渲染 - 但是你可以只存一个 static 或者 singleton 的
TreeModelobject,记录树的多边形、颜色等等信息 (假设你地图上所有的树都长一样) - 然后你的
Treeobject 就可以引用或者指向这个TreeModelobject,然后再保存 coordinate 这些自身 specific 的信息 - 这样比较省空间的
Treeobject 我们成为 flyweight object
总结得也不错:
Flyweight, like its name implies, comes into play when you have objects that need to be more lightweight, generally because you have too many of them. The Flyweight pattern is purely about efficiency.
极端一点说,所有带 static 的 object 都可以看做 flyweight object
6.1.2 Choosing the Best Strategy: Simple Approach
炫技一波:
promos = [fidelity_promo, bulk_item_promo, large_order_promo]

def best_promo(order):
	"""Select best discount available"""
	return max(promo(order) for promo in promos)
6.1.3 Advanced Approach: Finding Strategies in a Module
"""
globals():
	Return a dictionary representing the current global symbol table. This is always the
	dictionary of the current module (inside a function or method, this is the module
	where it is defined, not the module from which it is called).
"""
promos = [globals()[name] for name in globals() if name.endswith('_promo') and name != 'best_promo']

def best_promo(order):
	"""Select best discount available"""
	return max(promo(order) for promo in promos)
Another way of collecting the available promotions would be to create a module, promotions.py, and put all the strategy functions there, except for best_promo.
promos = [func for name, func in inspect.getmembers(promotions, inspect.isfunction)]
6.2 Command Pattern
class MacroCommand:
	"""A command that executes a list of commands"""

	def __init__(self, commands):
		self.commands = list(commands)

	def __call__(self):
		for command in self.commands:
			command()  ## Need implementation of `__call__` inside each command object
Part IV - Object-Oriented Idioms
Chapter 7 - Function Decorators and Closures
7.1 Decorators 101
A decorator is a callable which can take the decorated function as argument. (另外还有 class decorator)
Assume we have a decorator named foo,
@foo
def baz():
	print('running baz')

# ----- is roughly equivalent to -----

def foo(func):
	print('running foo')
	return func

def baz():
	print('running baz')

baz = foo(baz)
注意上面的例子中:
baz定义结束时,@foo会立即执行 (相当于替换了baz的定义)- 换言之,当
baz所在的 module 被 load 进来的时候,@foo就会执行
- 换言之,当
- 调用
baz()时并不会执行@foo
7.2 When Python Executes Decorators
When Python Executes Decorators A key feature of decorators is that they run right after the decorated function is defined. That is usually at import time.
- Decorated functions are invoked at runtime.
7.3 Decorator-Enhanced Strategy Pattern
promos = []  # promotions registry

def promotion(promo_func):
	promos.append(promo_func)  # register this promotion
	return promo_func

@promotion
def fidelity(order):
	"""5% discount for customers with 1000 or more fidelity points"""
	...

@promotion
def bulk_item(order):
	"""10% discount for each LineItem with 20 or more units"""
	...

@promotion
def large_order(order):
	"""7% discount for orders with 10 or more distinct items"""
	...

def best_promo(order):
	"""Select best discount available"""
	return max(promo(order) for promo in promos)
Pros:
- The promotion strategy functions don’t have to use special names.
- The
@promotiondecorator highlights the purpose of the decorated function, and also makes it easy to temporarily disable a promotion - Promotional discount strategies may be defined in other modules, anywhere in the system, as long as the
@promotiondecorator is applied to them.
7.4 Variable Scope Rules
Code that uses inner functions almost always depends on closures to operate correctly. To understand closures, we need to take a step back a have a close look at how variable scopes work in Python.
>>> b = 6
>>> def f2(a):
...		print(a)
...		print(b)
...		b = 9
...
>>> f2(3)
3
Traceback (most recent call last):
File "<stdin>", line 1, in <module>
File "<stdin>", line 3, in f2
UnboundLocalError: local variable 'b' referenced before assignment
The fact is, when Python compiles the body of the function, it decides that b is a local variable because it is assigned within the function. The generated bytecode reflects this decision and will try to fetch b from the local environment. Try the following code to see bytecode:
from dis import dis
dis(f2)
This is not a bug, but a design choice: Python does not require you to declare variables, but assumes that a variable assigned in the body of a function is local.
If we want the interpreter to treat b as a global variable in spite of the assignment within the function, we use the global declaration:
>>> b = 6
>>> def f2(a):
... 	global b
...		print(a)
...		print(b)
...		b = 9
...
>>> f2(3)
3
6
>>> b
9
7.5 Closures
A closure is a function with an extended scope that encompasses nonglobal variables referenced in the body of the function but not defined there. It does not matter whether the function is anonymous or not; what matters is that it can access nonglobal variables that are defined outside of its body.
Consider the following example:

>>> avg = make_averager()
>>> avg(10)
10.0
>>> avg(11)
10.5
>>> avg(12)
11.0
Within averager, series is a free variable. This is a technical term meaning a variable that is not bound in the local scope. 我们也称 The closure for averager extends the scope of that function to include the binding for the free variable series.
Inspecting the free variable:
>>> avg.__code__.co_varnames
('new_value', 'total')
>>> avg.__code__.co_freevars
('series',)
The binding for series is kept in the __closure__ attribute of the returned function avg. Each item in avg.__closure__ corresponds to a name in avg.__code__.co_freevars. These items are “cells”, and they have an attribute called cell_contents where the actual value can be found.
>>> avg.__code__.co_freevars
('series',)
>>> avg.__closure__
(<cell at 0x107a44f78: list object at 0x107a91a48>,)
>>> avg.__closure__[0].cell_contents
[10, 11, 12]
7.6 The nonlocal Declaration
之前的 make_averager 实现不够 efficient,一个新的写法是:
# Wrong!
def make_averager():
	count = 0
	total = 0

	def averager(new_value):
		count += 1
		total += new_value
		return total / count

	return averager
但是运行时出错:
>>> avg = make_averager()
>>> avg(10)
Traceback (most recent call last):
...
UnboundLocalError: local variable 'count' referenced before assignment
原因是:
- 在 closure 范围内,nested function body 内部对 free variable
foo的 “rebind” 操作,都会 implicitly create local variblefoo- 之前的
series.append(new_value)操作不会触发 “创建 local varibleseries” 是因为:list是 mutable 的list.append()的操作不会创建新的list
- 而这里
count += 1和total += new_value的操作会创建两个 local variablecount和total是因为:- number 是 immutable 的
+=操作会创建新的 number
- 之前的
- 隐式创建的 local variable 会干扰你对 free varible 的引用 (编译器不知道你要用的具体是哪一个)
解决这个问题的方法是:用 nonlocal 声明。It lets you flag a variable as a free variable even when it is assigned a new value within the function.
# OK!
def make_averager():
	count = 0
	total = 0

	def averager(new_value):
		nonlocal count, total  # key statement!
		count += 1
		total += new_value
		return total / count

	return averager
7.7 Decorators in the Standard Library
7.7.1 Memoization with functools.lru_cache
注意 decorator 可以多包一层,以达到可以带参初始化的目的。
我们先看原始的写法:
# 原始 decorator
def foo(func):
	print('running foo')
	return func

@foo
def baz():
	print('running baz')
相当于 baz = foo(baz)。
带参的写法:
# 带参 decorator
def foo(msg):
	def wrapper(func):
		print(msg)
		return func
	return wrapper

@foo('running foo another way')
def baz():
	print('running baz')
相当于 baz = foo(msg)(baz)。
functools.lru_cache 就是一个带参 decorator,它的作用是 to cache recent call results。它内部会维护一个 dict 来记录 <arg_list, result>,从而达到 cache 的作用。适用的场景比如:
- http request
- 递归
@functools.lru_cache(maxsize=128)
def fibonacci(n):
	if n < 2:
		return n
	return fibonacci(n-2) + fibonacci(n-1)
7.7.2 Generic Functions with Single Dispatch
这个厉害了。书上的例子是 “格式输出 html 代码”,针对不同的类型的变量,有不同的输出策略。不用 OO,用 function 就可以实现 overloading。
from functools import singledispatch
from collections import abc
import numbers
import html

@singledispatch
def htmlize(obj):
	content = html.escape(repr(obj))
	return '<pre>{}</pre>'.format(content)

@htmlize.register(str)
def _(text):
	content = html.escape(text).replace('\n', '<br>\n')
	return '<p>{0}</p>'.format(content)

@htmlize.register(numbers.Integral)
def _(n):
	return '<pre>{0} (0x{0:x})</pre>'.format(n)

@htmlize.register(tuple)
@htmlize.register(abc.MutableSequence)
def _(seq):
	inner = '</li>\n<li>'.join(htmlize(item) for item in seq)
	return '<ul>\n<li>' + inner + '</li>\n</ul>'
- 带
@singledispatch标记的 function 我们称为 generic function.- 默认实现是
htmlize(obj) str类型的输入对应的实现是_(text)- 依此类推
- 默认实现是
- The name of the specialized functions is irrelevant;
_is a good choice to make this clear. - 可以映射多个输入类型到同一个 specialized function
需要注意的是:@singledispatch is not designed to bring Java-style method overloading to Python. The advantage of @sin gledispath is supporting modular extension: each module can register a specialized function for each type it supports.
7.8 Stacked Decorators
@d1
@d2
def foo():
	pass
等同于 foo = d1(d2(foo)),注意顺序
Digress: @functools.wrap
decorator 有个小弊端是:decorated function 的 name 和 docstring 属性会跑到 wrapper function 那里去,比如:
def foo(func):
    def func_wrapper(*args, **kwds):
        """This is foo.func_wrapper()"""
        return func(*args, **kwds)
    return func_wrapper

@foo
def baz():
    """This is baz()"""
>>> baz.__name__
'func_wrapper'
>>> baz.__doc__
'This is foo.func_wrapper()'
为了解决这个问题,我们可以用 @functools.wrap 来 decorate 这个 wrapper:
from functools import wraps

def foo(func):
    @wraps(func)
    def func_wrapper(*args, **kwds):
        """This is foo.func_wrapper()"""
        return func(*args, **kwds)
    return func_wrapper

@foo
def baz():
    """This is baz()"""
>>> baz.__name__
'baz'
>>> baz.__doc__
'This is baz()'
它的逻辑是:
wrap(func)返回一个functools.partial(functools.update_wrapper, wrapped=func)wrap(func)(func_wrapper)相当于func_wrapper = functools.update_wrapper(wrapper=func_wrapper, wrapped=func)
Chapter 8 - Object References, Mutability, and Recycling
We start the chapter by presenting a metaphor for variables in Python: variables are labels, not boxes.
8.1 Variables Are Not Boxes
Better to say: “Variable s is assigned to the seesaw,” but never “The seesaw is assigned to variable s.” With reference variables, it makes much more sense to say that the variable is assigned to an object, and not the other way around. After all, the object is created before the assignment.
To understand an assignment in Python, always read the righthand side first: that’s where the object is created or retrieved. After that, the variable on the left is bound to the object, like a label stuck to it. Just forget about the boxes.
8.2 Identity, Equality, and Aliases
Every object has
- an identity,
- comparable using
is
- comparable using
- a type
- and a value (the data it holds).
- comparable using
==(python 的foo == bar相当于 java 的foo.equals(bar))
- comparable using
An object’s identity never changes once it has been created; you may think of it as the object’s address in memory. The is operator compares the identity of two objects; the id() function returns an integer representing its identity.
The real meaning of an object’s ID is implementation-dependent. In CPython, id() returns the memory address of the object, but it may be something else in another Python interpreter. The key point is that the ID is guaranteed to be a unique numeric label, and it will never change during the life of the object.
In practice, we rarely use the id() function while programming. Identity checks are most often done with the is operator, and not by comparing IDs.
8.2.1 Choosing Between == and is
The == operator compares the values of objects, while is compares their identities.
However, if you are comparing a variable to a singleton, then it makes sense to use is. E.g. if x is None.
The is operator is faster than ==, because it cannot be overloaded, so Python does not have to find and invoke special methods to evaluate it, and computing is as simplecomparing two integer IDs. In contrast, a == b is syntactic sugar for a.__eq__(b). The __eq__ method inherited from object compares object IDs, so it produces the same result as is. But most built-in types override __eq__ with more meaningful implementations that actually take into account the values of the object attributes.
8.2.2 The Relative Immutability of Tuples
注意 immutable 的含义是本身的 value 不可变:
>>> a = (1,2)
>>> a[0] = 11
Traceback (most recent call last):
  File "<stdin>", line 1, in <module>
TypeError: 'tuple' object does not support item assignment

>>> b = "hello"
>>> b[0] = "w"
Traceback (most recent call last):
  File "<stdin>", line 1, in <module>
TypeError: 'str' object does not support item assignment
你需要新的值就自己去创建一个新的,不可能把我当前的值修改一下再拿去用。
但是,Tuples, like most Python collections–lists, dicts, sets, etc.–hold references to objects. If the referenced items are mutable, they may change even if the tuple itself does not.
>>> t1 = (1, 2, [30, 40])
>>> id(t1[-1])
4302515784
>>> t1[-1].append(99)
>>> t1
(1, 2, [30, 40, 99])
>>> id(t1[-1])
4302515784
所以我们可以更新下 immutable 的定义:本身的 value 不可变;如果 value 内部包含 reference,这个 reference 不可变,但 reference 对应的 object 可变。
tuple 设计成 immutable 的好处是:
- python 中必须 immutable 才能 hashable,所以 tuple 可以做 dict 的 key (list 就不可以)
- function 接收参数 tuple 时不用担心 tuple 被篡改,可以免去 defensive copy 的操作,算得上是一种 optimization
8.3 Copies Are Shallow by Default
For mutable sequences, there are 2 ways of copying:
- By constructor:
a = [1,2]; b = list(a) - By slicing:
a = [1,2]; b = a[:]
N.B. for a tuple t, neither t[:] nor tuple(t) makes a copy, but returns a reference to the same object. The same behavior can be observed with instances of str, bytes, and frozenset.
但是!这样的 copy 都是 shallow copy。考虑 list 内还有 list 和 tuple 的场景:
a = [1, [22, 33, 44], (7, 8, 9)]
b = list(a)

a.append(100)    # changes ONLY a
a[1].remove(44)  # changes BOTH a and b

print('a:', a)   # a: [1, [22, 33], (7, 8, 9), 100]
print('b:', b)   # b: [1, [22, 33], (7, 8, 9)]

b[1] += [55, 66] # changes BOTH a and b
b[2] += (10, 11) # changes ONLY b because tuples are immutable

print('a:', a)   # a: [1, [22, 33, 55, 66], (7, 8, 9), 100]
print('b:', b)   # b: [1, [22, 33, 55, 66], (7, 8, 9, 10, 11)]
8.3.1 Deep and Shallow Copies of Arbitrary Objects
from copy import copy, deepcopy

a = [1, [22, 33, 44], (7, 8, 9)]

b = copy(a)      # shallow copy
c = deepcopy(a)  # as name sugguests
>>> id(a[1])
140001961723656
>>> id(b[1])
140001961723656
>>> id(c[1])
140001961723592
Note that making deep copies is not a simple matter in the general case.
- Objects may have cyclic references that would cause a naive algorithm to enter an infinite loop.
- The
deepcopyfunction remembers the objects already copied to handle cyclic references gracefully.
- The
- Also, a deep copy may be too deep in some cases. For example, objects may refer external resources or singletons that should not be copied.
- You can control the behavior of both
copyanddeepcopyby implementing the__copy__()and__deepcopy__()special methods
- You can control the behavior of both
8.4 Function Parameters as References
The only mode of parameter passing in Python is call by sharing. That is the same mode used in most OO languages, including Ruby, SmallTalk, and Java (this applies to Java reference types; primitive types use call by value). Call by sharing means that each formal parameter of the function gets a copy of each reference in the arguments. In other words, the parameters inside the function become aliases of the actual arguments.
The result of this scheme is that a function may change any mutable object passed as a parameter, but it cannot change the identity of those objects.
8.4.1 Mutable Types as Parameter Defaults: Bad Idea
这个现象前所未见!先上例子
class HauntedBus:
	"""A bus model haunted by ghost passengers"""
	def __init__(self, passengers=[]):  # Tricky Here!
		self.passengers = passengers

	def pick(self, name):
		self.passengers.append(name)

	def drop(self, name):
		self.passengers.remove(name)
>>> bus1 = HauntedBus()
>>> bus1.pick('Alice')

>>> bus2 = HauntedBus()
>>> bus2.passengers
['Alice']

>>> bus2.pick('Bob')
>>> bus1.passengers
['Alice', 'Bob']
The problem is that each default value is eval‐ uated when the function is defined–i.e., usually when the module is loaded–and the default values become attributes of the function object. So if a default value is a mutable object, and you change it, the change will affect every future call of the function.
所以,默认参数的逻辑相当于:
HauntedBus.__init__.__defaults__ = []

bus1 = HauntedBus(HauntedBus.__init__.__defaults__)
	# bus1.passengers = HauntedBus.__init__.__defaults__ (==[])
bus1.pick('Alice')
	# bus1.passengers.append('Alice')
	# ALSO changes HauntedBus.__init__.__defaults__

bus2 = HauntedBus(HauntedBus.__init__.__defaults__)
	# bus2.passengers = HauntedBus.__init__.__defaults__ (==['Alice'])
The issue with mutable defaults explains why None is often used as the default value for parameters that may receive mutable values. Best practice:
class Bus:
	def __init__(self, passengers=None):
		if passengers is None:
			self.passengers = []
		else:
			self.passengers = list(passenger)  # or deep copy if necessary
8.4.2 Defensive Programming with Mutable Parameters
When you are coding a function that receives a mutable parameter, you should carefully consider whether the caller expects the argument passed to be changed.
8.5 del and Garbage Collection
The del statement deletes names, not objects. An object may be garbage collected as result of a del command, but only if the variable deleted holds the last reference to the object, or if the object becomes unreachable. Rebinding a variable may also cause the number of references to an object to reach zero, causing its destruction.
N.B. __del__ is invoked by the Python interpreter when the instance is about to be destroyed to give it a chance to release external resources. You will seldom need to implement __del__ in your own code. (感觉和 java 里面你不需要去写 finalize() 差不多)
- In CPython, the primary algorithm for garbage collection is reference counting. As soon as that refcount reaches 0, the object is immediately destroyed: CPython calls the
__del__method on the object (if defined) and then frees the memory allocated to the object. - In CPython 2.0, a generational garbage collection algorithm was added to detect groups of objects involved in reference cycles–which may be unreachable even with outstand‐ ing references to them, when all the mutual references are contained within the group.
To demonstrate the end of an object’s life, the following example uses weakref.finalize to register a callback function to be called when an object is destroyed.
>>> import weakref
>>> s1 = {1, 2, 3}
>>> s2 = s1
>>> def bye():
...     print('Gone with the wind...')
...
>>> ender = weakref.finalize(s1, bye)
>>> ender.alive
True
>>> del s1
>>> ender.alive
True
>>> s2 = 'spam'
Gone with the wind...
>>> ender.alive
False
8.6 Weak References
概念可以参考 Understanding Weak References.
Weak references to an object do not increase its reference count. The object that is the target of a reference is called the referent. Therefore, we say that a weak reference does not prevent the referent from being garbage collected.
8.6.1 The WeakValueDictionary Skit
The class WeakValueDictionary implements a mutable mapping where the values are weak references to objects. When a referent is garbage collected elsewhere in the program, the corresponding key is automatically removed from WeakValueDictionary. This is commonly used for caching.
8.6.2 Limitations of Weak References
Not every Python object may be the referent of a weak reference.
- Basic list and dict instances may not be referents, but a plain subclass of either can solve this problem easily.
intand tuple instances cannot be referents of weak references, even if subclasses of those types are created.
Most of these limitations are implementation details of CPython that may not applyother Python iterpreters.
8.7 Tricks Python Plays with Immutables
The sharing of string literals is an optimization technique called interning. CPython uses the same technique with small integers to avoid unnecessary duplication of “popular” numbers like 0, –1, and 42. Note that CPython does not intern all strings or integers, and the criteria it uses to do so is an undocumented implementation detail.
Chapter 9 - A Pythonic Object
9.1 Object Representations
__repr__(): returns a string representing the object as the developer wants to see it.__str__(): returns a string representing the object as the user wants to see it.__byte__(): called bybyte()to get the object represented as a byte sequence__format__(): called byforamt()orstr.format()to get string displays using special formatting codes
9.2 Vector Class Redux
没啥特别的,注意写法:
class Vector2d:
	typecode = 'd'

	def __init__(self, x, y):
		self.x = float(x)
		self.y = float(y)

	def __iter__(self):
		return (i for i in (self.x, self.y))

	def __repr__(self):
		class_name = type(self).__name__  # 考虑到继承;灵活获取 class name 而不是写死
		return '{}({!r}, {!r})'.format(class_name, *self)

	def __str__(self):
		return str(tuple(self))

	def __bytes__(self):
		return (bytes([ord(self.typecode)]) + bytes(array(self.typecode, self)))

	def __eq__(self, other):
		return tuple(self) == tuple(other)

	def __abs__(self):
		return math.hypot(self.x, self.y)

	def __bool__(self):
		return bool(abs(self))
*self展开这个写法帅气~- 注意
*foo要求foo是个 iterable (上面有__iter__()所以满足条件) __iter__()要求返回一个 iterator,上面例子里返回的是一个 generator (from a generator expression)- 注意它不是 tuple-comp,因为 python 不存在 tuple-comp 这种东西
- 然后根据 Iterables vs. Iterators vs. Generators 我们得知 a generator is always a iterator,所以这个
__iter__()写法成立 - 还有一种写法也可以:
yield self.x; yield.self.y
8.3 classmethod vs staticmethod
先上例子:
class Demo:
    @classmethod
    def class_method(*args):
        return args

    @staticmethod
    def static_method(*args):
        return args
>>> Demo.class_method()
(<class __main__.Demo at 0x7f206749d6d0>,)
>>> Demo.class_method('Foo')
(<class __main__.Demo at 0x7f206749d6d0>, 'Foo')
>>> Demo.static_method()
()
>>> Demo.static_method('Foo')
('Foo',)
@staticmethod好理解@classmethod第一个参数必定是 class 本身- 注意这里 “class 本身” 指的是
Demo而不是Demo.__class__ - 所以类似成员 method 第一个参数默认写
self一样,@classmethod第一个参数默认写clsdef member_method(self, *args)def class_method(cls, *args)
- 这个
cls可以当 constructor 用
- 注意这里 “class 本身” 指的是
class Demo:
    def __init__(self, value):
        self.value = value

    @classmethod
    def class_method(cls, value):
        return cls(value)

d = Demo.class_method(2)
print(d.value)  # Output: 2
8.4 Making It Hashable
To make Vector2d hashable, we must
- Implement
__hash__()__eq__()is also required then
- Make it immutable
To make Vector2d, we can only expose the getters, like
class Vector2d:
	def __init__(self, x, y):
		self.__x = float(x)
		self.__y = float(y)

	@property
	def x(self):
		return self.__x

	@property
	def y(self):
		return self.__y

v = Vector2d(3, 4)

print(v.x)  # accessible
# v.x = 7   # forbidden!
8.4.1 Digress: @property / __getattribute__() / __get__()
要想搞清楚 @property 的工作原理,我们需要先搞清楚 b.x 这样一个访问 object 字段的表达式是如何被解析的:
b.x- $\Rightarrow$
b.__getattribute__('x')- CASE 1:
b.__dict__['x']has defined__get__()$\Rightarrow$b.__dict__['x'].__get__(b, type(b))- 若是访问 static member
B.x则会变成B.__dict__['x'].__get__(None, B)
- 若是访问 static member
- CASE 2:
b.__dict__['x']has not defined__get__()$\Rightarrow$ just returnb.__dict__['x']- 若是访问 static member
B.x则会变成B.__dict__['x']
- 若是访问 static member
- CASE 1:
- $\Rightarrow$
如果没有用 @property,一般的 b.x 都是 CASE 2,因为一般的 int、string 这些基础类型都没有实现 __get__();用了 @property 的话,就是强行转成了 CASE 1,因为 property(x) 返回的是一个 property 对象,它是自带 __get__ 方法的。
N.B. 我们称实现了以下三个方法的类型为 descriptor
__get__(self, obj, type=None) --> value__set__(self, obj, value) --> None__delete__(self, obj) --> None
property 类型是 descriptor
我们来看一下代码分解:
class B:
	@property
	def x(self):
		return self.__x

# ----- Is Equivalent To ----- #

property_x = property(fget=x)
x = __dict__['x'] = property_x
然后就有
b.x- $\Rightarrow$
b.__dict__['x'].__get__(b, type(b))- $\Rightarrow$
property_x.__get__(b, type(b))- $\Rightarrow$
property_x.fget(b)- $\Rightarrow$ 实际调用原始的
x(b)方法 (TMD 又绕回去了) - 注意:此时
b.x()方法是调用不到的,因为b.x被优先解析了;这里property_x内部还能调用x(b)是因为它保存了这个原始的def x(self)方法
- $\Rightarrow$ 实际调用原始的
- $\Rightarrow$
- $\Rightarrow$
- $\Rightarrow$
这里最 confusing 的地方在于:b.x 从一个 method 变成了一个 property 对象,而且屏蔽掉了对 b.x() 方法的访问。一个不那么 confusing 的写法是:
class B:
	def get_x(self):
		return self.__x

	x = property(fget=get_x, fset=None, fdel=None, "Docstring here")
8.4.2 Digress Further: x.setter / x.deleter
代码分解:
# python 2 需要继承 `object` 才是 new-style class
# python 3 默认是 new-style class,继不继承 `object` 无所谓
# `x.setter` 和 `x.deleter` 需要在 new-style class 内才能正常工作
class B(object):
    def __init__(self):
        self._x = None

    @property
    def x(self):         # method-1
        """I'm the 'x' property."""
        return self._x

    @x.setter
    def x(self, value):  # method-2
        self._x = value

    @x.deleter
    def x(self):         # method-3
        del self._x

# ----- Is Equivalent To ----- #

x = property(fget=x)  # 屏蔽了对 method-1 的访问
x = x.setter(x)       # 屏蔽了对 method-2 的访问
	# 实际是返回了原来 property 的 copy,并设置了 `fset`
	# x = property(fget=x.fget, fset=x)
x = x.deleter(x)      # 屏蔽了对 method-3 的访问
	# 实际是返回了原来 property 的 copy,并设置了 `fdel`
	# x = property(fget=x.fget, fset=x.fset, fdel=x)
不那么 confusing 的写法:
class B(object):
    def __init__(self):
        self._x = None

    def get_x(self):
        return self._xshiyong

    def set_x(self, value):
        self._x = value

    def del_x(self):
        del self._x

    x = property(fset=get_x, fset=set_x, fdel=del_x, "Docstring here")
8.4.3 __hash__()
The __hash__ special method documentation suggests using the bitwise XOR operator (^) to mix the hashes of the components.
class Vector2d:
	def __eq__(self, other):
		return tuple(self) == tuple(other)

	def __hash__(self):
		return hash(self.x) ^ hash(self.y)
8.5 “Private” and “Protected”
Too prevent accidental overwritting of a private attribute of a class, python would store __bar attribute of class Foo in Foo.__dict__ as _Foo__bar. This language feature is called name mangling.
Name mangling is about safety, not security: it’s designed to prevent accidental access and not intentional wrongdoing.
- name mangling 不会处理
__foo__这样前后都有双下划线的 name
The single underscore prefix, like _bar, has no special meaning to the Python interpreter when used in attribute names, but it’s a very strong convention among Python programmers that you should not access such attributes from outside the class.
- 补充:If you use a wildcard import (
from pkg import *) to import all the names from the module, Python will not import names with a leading underscore (unless the module defines an__all__list that overrides this behavior). 从这个角度来讲,wildcard import 应该慎用。
8.6 Saving Space with the __slots__ Class Attribute
By default, Python stores instance attributes in a per-instance dict named __dict__. Dictinaries have a significant memory overhead, especially when you are dealing with millions of instances with few attributes. The __slots__ class attribute can save a lot of memory, by letting the interpreter store the instance attributes in a tuple instead of a dict.
- A
__slots__attribute inherited from a superclass has no effect. Python only takes into account slots attributes defined in each class individually.
class Vector2d:
	__slots__ = ('__x', '__y')

	def __init__(self, x, y):
		self.__x = float(x)
		self.__y = float(y)
When __slots__ is specified in a class, its instances will not be allowed to have any other attributes apart from those named in __slots__. It’s considered a bad practice to use __slots__ just to prevent users of your class from creating new attributes. __slots__ should used for optimization, not for programmer restraint.
It may be possible, however, to “save memory and eat it too”: if you add __dict__ to the __slots__ list, your instances will keep attributes named in __slots__ in the per-instance tuple, but will also support dynamically created attributes, which will be stored in the usual __dict__, entirely defeating __slots__’s purpose.
There is another special per-instance attribute that you may want to keep: the __weak ref__ attribute, which exists by default in instances of user-defined classes. However, if the class defines __slots__, and you need the instances to be target of weak references, then you need to include __weakref__ among the attribute named in __slots__.
8.7 Overriding Class Attributes
比如前面的 typecode = 'd' 和 __slots__ 这样不带 self 初始化的都是 class attributes,类似 java 的 static.
If you write to an instance attribute that does not exist, you create a new instance attribute. 假设你有一个 class attribute Foo.bar 和 instance f,正常情况下 f.bar 可以访问到 Foo.bar,但你可以重新赋值 f.bar = 'baz' 从而覆盖掉原有的 f.bar 的值,同时 class attribute Foo.bar 不会受影响。这实际上提供了一种新的继承和多态的思路 (不用把 bar 设计成 Foo 的 instance attribute)。
Chapter 10 - Sequence Hacking, Hashing, and Slicing
In this chapter, we will create a class to represent a multidimensional Vector class–a significant step up from the two-dimensional Vector2d of Chapter 9.
10.1 Vector Take #1: Vector2d Compatible
先说个题外话,你在 console 里面直接输入 f 然后回车,调用的是 f.__repr__(),而 print(f) 调用的是 f.__str__() (如果有定义的话;没有的话还是会 fall back 到 f.__repr__())
>>> class Foo:
...     def __repr__(self):
...             return "Running Foo.__repr__()"
...     def __str__(self):
...             return "Running Foo.__str__()"
...
>>> f = Foo()
>>> f
Running Foo.__repr__()
>>> print(f)
Running Foo.__str__()
这也说明一点:你在 debug 的时候不应该把 __repr__ 设计得太复杂,想想一下满屏的字符串看起来是有多头痛。
from array import array
import reprlib
import math

class Vector:
	typecode = 'd'
	def __init__(self, components):
		self._components = array(self.typecode, components)

	def __iter__(self):
		return iter(self._components)

	def __repr__(self):
		components = reprlib.repr(self._components)
		components = components[components.find('['):-1]
		return 'Vector({})'.format(components)

	def __str__(self):
		return str(tuple(self))

	def __bytes__(self):
		return (bytes([ord(self.typecode)]) + bytes(self._components))

	def __eq__(self, other):
		return tuple(self) == tuple(other)

	def __abs__(self):
		return math.sqrt(sum(x * x for x in self))

	def __bool__(self):
		return bool(abs(self))

	@classmethod
	def frombytes(cls, octets):
		typecode = chr(octets[0])
		memv = memoryview(octets[1:]).cast(typecode)
		return cls(memv)
上面这个 __repr__ 的处理就很值得学习:reprlib.repr() 的返回值类似 array('d', [0.0, 1.0, 2.0, 3.0, 4.0, ...]),超过 6 个元素就会用省略号表示;然后上面的代码再截取出 [...] 的部分然后格式化输出。
Digress: Protocols and Duck Typing
In the context of object-oriented programming, a protocol is an informal interface, defined only in documentation and not in code. 简单说,只要实现了 protocol 要求的函数,你就是 protocol 的实现,并不用显式声明你要实现这个 protocol (反例就是 java 的 interface)
Duck Typing 的源起:
Don’t check whether it is-a duck: check whether it quacks-like-a duck, walks-like-a duck, etc, etc, depending on exactly what subset of duck-like behavior you need to play your language-games with. (comp.lang.python, Jul. 26, 2000) — Alex Martelli
简单说就是 python 并不要求显式声明 is-a (当然你要显式也是可以的–用 ABC,但是需要注意不仅限于 abc.ABC,还有 collections.abc 等细分的 ABC,比如 MutableSequence;参 11.3 章节),like-a 在 python 里等同于 is-a。
10.2 Vector Take #2: A Sliceable Sequence
Basic sequence protocol: __len__ and __getitem__:
class Vector:
	def __len__(self):
		return len(self._components)

	def __getitem__(self, index):
		return self._components[index]
>>> v1 = Vector([3, 4, 5])
>>> len(v1)
3
>>> v1[0], v1[-1]
(3.0, 5.0)
>>> v7 = Vector(range(7))
>>> v7[1:4]
array('d', [1.0, 2.0, 3.0])  # It would be better if a slice of Vector is also a Vector
10.2.1 How Slicing Works
>>> class MySeq:
... 	def __getitem__(self, index):
...		return index
...
>>> s = MySeq()
>>> s[1]
1
>>> s[1:4]
slice(1, 4, None)
>>> s[1:4:2]
slice(1, 4, 2)
>>> s[1:4:2, 9]
(slice(1, 4, 2), 9)
>>> s[1:4:2, 7:9]
(slice(1, 4, 2), slice(7, 9, None))
可以看到:
s[1]$\Rightarrow$s.__getitem__(1)s[1:4]$\Rightarrow$s.__getitem__(slice(1, 4, None))s[1:4:2]$\Rightarrow$s.__getitem__(slice(1, 4, 2))s[1:4:2, 9]$\Rightarrow$s.__getitem__((slice(1, 4, 2), 9))s[1:4:2, 7:9]$\Rightarrow$s.__getitem__((slice(1, 4, 2), slice(7, 9, None)))
slice is a built-in type. slice(1, 4, 2) means “start at 1, stop at 4, step by 2”. dir(slice) you’ll find 3 attributes, start, stop, step and 1 method, indices.
假设有一个 s = slice(...),那么 s.indices(n) 的作用就是:当我们用 s 去 slice 一个长度为 n 的 sequence 时,s.indices(n) 会返回一个 tuple (start, stop, step) 表示这个 sequence-specific 的 slice 信息。举个例子说:slice(0, None, None) 是一个 general 的 slice,但当它作用于一个长度为 5 和一个长度为 7 的 sequence 时,它内部的逻辑是不一样的,一个会变成 [1:5] 另一个会变成 [1:7]。
>>> s = slice(0, None, None)
>>> s.indices(5)
(0, 5, 1)
>>> s.indices(7)
(0, 7, 1)
slice 有很多类似这样的 “智能的” 处理方法,比如 “如果 step 比 n 还要大的时候该怎么办”;可以参考这篇
The Intelligence Behind Python Slices。
另外需要注意的是,如果你自己去实现一个 sequence from scratch,你可能需要类似 Extended Slices 上这个例子的实现:
class FakeSeq:
    def calc_item(self, i):
        """Return the i-th element"""

    def __getitem__(self, item):
        if isinstance(item, slice):
            indices = item.indices(len(self))
            return FakeSeq([self.calc_item(i) for i in range(*indices)])
        else:
            return self.calc_item(i)
如果你是组合了一个 built-in sequence 来实现自己的 sequence,你就不需要用到 s.indices(n) 方法,因为可以直接 delegate 给这个 built-in sequence 去处理,书上的例子就是这样的,见下。
10.2.2 A Slice-Aware __getitem__
def __getitem__(self, index):
	cls = type(self)

	if isinstance(index, slice):
		return cls(self._components[index])
	elif isinstance(index, numbers.Integral):
		return self._components[index]
	else:
		msg = '{cls.__name__} indices must be integers'
		raise TypeError(msg.format(cls=cls))
10.3 Vector Take #3: Dynamic Attribute Access
我们想保留 “用 x, y, z 和 t 来指代一个 vector 的前 4 个维度” 这么一个 convention,换言之我们想要有 v.x == v[0] etc.
方案一:用 @property 去写 4 个 getter
方案二:用 __getattr__。等 v.x 这个 attribute lookup fails,然后 fall back 到 __getattr__ 处理。这个方案更灵活。
shortcut_names = 'xyzt'

def __getattr__(self, name):
	cls = type(self)

	if len(name) == 1:
		pos = cls.shortcut_names.find(name)
		if 0 <= pos < len(self._components):
			return self._components[pos]

	msg = '{.__name__!r} object has no attribute {!r}'
	raise AttributeError(msg.format(cls, name))
但是这么一来会引入一个新的问题:你如何处理 v.x = 10 这样的赋值?是允许它创建一个新的 attribute x?还是去修改 v[0] 的值?
如果你允许它创建新的 attribute x,那么下次 v.x 就不会 fall back 到 __getattr__ 了。去修改 v[0] 我觉得是可行的,但是书上决定把 v.x 到 v.t 这 4 个 attribute 做成 read-only,同时禁止创建名字为单个小写字母的 attribute。这些逻辑的去处是 __setattr__:
def __setattr__(self, name, value):
	cls = type(self)

	if len(name) == 1:
		if name in cls.shortcut_names:
			error = 'readonly attribute {attr_name!r}'
		elif name.islower():
			error = "can't set attributes 'a' to 'z' in {cls_name!r}"
		else:
			error = ''

		if error:
			msg = error.format(cls_name=cls.__name__, attr_name=name)
			raise AttributeError(msg)

	super().__setattr__(name, value)  # 正常创建名字合法的 attribute
如果你要限定允许的 attribute name,一个可以 work 的方案是用 __slots__,但如同前面所说的,这个用途违背了 __slots__ 的设计初衷,不推荐使用。
10.4 Vector Take #4: Hashing and a Faster ==
import functools
import operator

class Vector:
	def __eq__(self, other): #
		return tuple(self) == tuple(other)

	def __hash__(self):
		# Generator expression!
		# Lazily compute the hash of each component.
		# 可以省一点空间,相对于 List 而言 (只占用一个元素的内存,而不是一整个 list 的)
		hashes = (hash(x) for x in self._components)
		return functools.reduce(operator.xor, hashes, 0)
When using reduce, it’s good practice to provide the third argument, reduce(function, iterable, initializer), to prevent this exception: TypeError: reduce() of empty sequence with no initial value (excellent message: explains the problem and how to fix it). The initializer is the value returned if the sequence is empty and is used as the first argument in the reducing loop, so it should be the identity value of the operation. As examples, for +, |, ^ the initializer should be 0, but for *, & it should be 1.
这个 __hash__ 的实现也是很好的 map-reduce 的例子:apply function to each item to generate a new series (map), then compute aggregate (reduce)。用下面这个写法就更明显了:
def __hash__(self):
	hashes = map(hash, self._components)
	return functools.reduce(operator.xor, hashes, 0)
对 high-dimensional 的 vector,我们的 __eq__ 性能可能会有问题。一个更好的实现是:
def __eq__(self, other):
	if len(self) != len(other):
		return False

	for a, b in zip(self, other):
		if a != b:
		return False

	return True

# ----- Even Better ----- #

def __eq__(self, other):
	return len(self) == len(other) and all(a == b for a, b in zip(self, other))
10.5 Vector Take #5: Formatting
略
Chapter 11 - Interfaces: From Protocols to ABCs
11.1 Monkey-Patching to Implement a Protocol at Runtime
Monkey patch refers to dynamic modifications of a class or module at runtime, motivated by the intent to patch existing third-party code as a workaround to a bug or feature which does not act as desired.
比如我们第一章的 FrenchDeck 不支持 shuffle() 操作,error 告诉我们底层原因是因为没有支持 __setitem__:
>>> from random import shuffle
>>> from frenchdeck import FrenchDeck
>>> deck = FrenchDeck()
>>> shuffle(deck)
Traceback (most recent call last):
File "<stdin>", line 1, in <module>
File ".../python3.3/random.py", line 265, in shuffle
x[i], x[j] = x[j], x[i]
TypeError: 'FrenchDeck' object does not support item assignment
所以我们可以直接在 runtime 里给 FrenchDeck 加一个 __setitem__ 而不用去修改它的源代码:
>>> def set_card(deck, position, card):
...		deck._cards[position] = card
...
>>> FrenchDeck.__setitem__ = set_card
>>> shuffle(deck)
有点像给 JS 元素动态添加 event-listener。
11.2 Subclassing an ABC
Python does not check for the implementation of the abstract methods at import time, but only at runtime when we actually try to instantiate the subclass.
11.3 ABCs in the Standard Library
Every ABC depends on abc.ABC, but we don’t need to import it ourselves except to create a new ABC.
11.3.1 ABCs in collections.abc
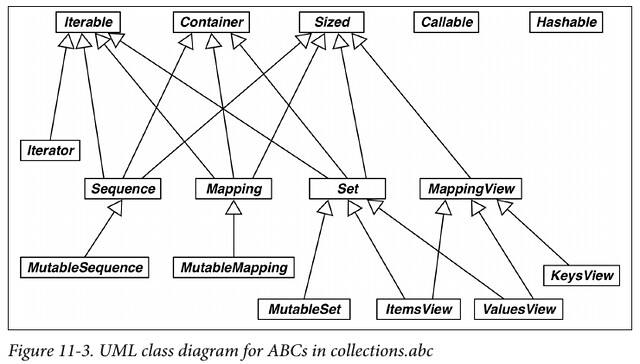
更详细的说明见 Python documentation - 8.4.1. Collections Abstract Base Classes
11.3.2 The numbers Tower of ABCs
numbers package 有如下的的继承关系:
Number- $\Uparrow$
Complex(A complex number is a number of the form $a + bi$, where $a$ and $b$ are real numbers and $i$ is the imaginary unit.)- $\Uparrow$
Real(A real number can be seen as a special complex where $b=0$; the real numbers include all the rational numbers and all the irrational numbers.)- $\Uparrow$
Rational(A Rational Number is a real number that can be written as a simple fraction, i.e. as a ratio. 反例:$\sqrt 2$)- $\Uparrow$
Integral
- $\Uparrow$
- $\Uparrow$
- $\Uparrow$
- $\Uparrow$
另外有:
int实现了numbers.Integral,然后boolsubclassesint,所以isinstance(x, numbers.Integral)对int和bool都有效isinstance(x, numbers.Real)对bool、int、float、fractions.Fraction都有效 (所以这不是一个很好的 check ifxis float 的方法)- However,
decimal.Decimal并没有实现numbers.Real
- However,
11.4 Defining and Using an ABC
An abstract method can actually have an implementation. Even if it does, subclasses will still be forced to override it, but they will be able to invoke the abstract method with super(), adding functionality to it instead of implementing from scratch.
注意版本问题:
import abc

# ----- Python 3.4 or above ----- #
class Foo(abc.ABC):
	pass

# ----- Before Python 3.4 ----- #
class Foo(metaclass=abc.ABCMeta):  # No `abc.ABC` before Python 3.4
	pass

# ----- Holy Python 2 ----- #
class Foo(object):  # No `metaclass` argument in Python 2
	__metaclass__ = abc.ABCMeta
	pass
Python 3.4 引入的逻辑其实是 def abc.ABC(metaclass=abc.ABCMeta)
另外 @abc.abstractmethod 必须是 innermost 的 decorator (i.e. 它与 def 之间不能再有别的 decorator)
11.5 Virtual Subclasses
我第一个想到的是 C++: Virtual Inheritance,但是在 python 这里 virtual subclass 根本不是这个意思。
python 的 virtual subclass 简单说,就是你的 VirtualExt 在 issubclass 和 isinstance 看来都是 Base 的子类,但实际上 VirtualExt 并不继承 Base,即使 Base 是 ABC,VirtualExt 也不用实现 Base 要求的接口。
不过说实话,你 issubclass 和 isinstance 都已经判断成子类了,我想不出你不用这个多态的理由……
具体写法:
import abc

class Base(abc.ABC):
	def __init__(self):
		self.x = 5

	@abc.abstractmethod
	def foo():
		"""Do nothing"""

class TrueBase():
	def __init__(self):
		self.y = 5

@Base.register
class VirtualExt(TrueBase):
	pass
>>> issubclass(VirtualExt, Base)
True
>>> issubclass(VirtualExt, TrueBase)
True
>>> ve = VirtualExt()
>>> isinstance(ve, Base)
True
>>> isinstance(ve, TrueBase)
True
>>> ve.x
Traceback (most recent call last):
  File "<stdin>", line 1, in <module>
AttributeError: 'VirtualExt' object has no attribute 'x'
>>> ve.foo()
Traceback (most recent call last):
  File "<stdin>", line 1, in <module>
AttributeError: 'VirtualExt' object has no attribute 'foo'
>>> ve.y
5
说明一下:
Base.register()其实是继承自abc.ABC.register(),意思是 “把VirtualExtregister 成Base的子类,with no doubt”- 进一步说明你只能 virtually 继承一个 ABC
issubclass(VirtualExt, Base) == True和isinstance(ve, Base) == True都成立但是VirtualExt既没有 attributex也没有实现foo- 所以说这是一个 “假” 继承 (我觉得叫 Fake Inheritance 更合适……)
class VirtualExt(TrueBase)这是一个 真·继承- 这里也不是多重继承
- 多重继承你得写成
class MultiExt(Base, TrueBase)
- 多重继承你得写成
Inheritance is guided by a special class attribute named __mro__, the Method Resolution Order. It basically lists the class and its superclasses in the order Python uses to search for methods.
>>> VirtualExt.__mro__
(<class '__main__.VirtualExt'>, <class '__main__.TrueBase'>, <class 'object'>)
Base is not in VirtualExt.__mro__. 这进一步验证了我们的结论:VirtualExt 并没有实际继承 Base。
11.5.1 issubclass Alternatives: __subclasses__ and _abc_registry
Base.__subclasses__()(注意这是一个方法)- 返回所有
Base的 immediate 子类 (即不会递归去找子类的子类)- 没有 import 进来的子类是不可能被找到的
- 不会列出 virtual 子类
- 不 care
Base是不是 ABC
- 返回所有
Base._abc_registry(注意这是一个attribute)- 要求
Base是 ABC - 返回所有
Base的 virtual 子类 - 返回值类型其实是一个
WeakSet,元素是 weak references to virtual subclasses
- 要求
11.5.2 __subclasshook__
- 必须是一个
@classmethod - 写在 ABC 父类中,如果
Base.__subclasshook__(Ext) == True,则issubclass(Ext, Base) == True- 注意这是由父类直接控制
issubclasses的逻辑 - 不需要走
Base.register()
- 注意这是由父类直接控制
书上的例子是 collections.abc.Sized,它的逻辑是:只要是实现了 __len__ 方法的类都是我 Sized 的子类:
class Sized(metaclass=ABCMeta):
	__slots__ = ()

	@abstractmethod
	def __len__(self):
		return 0

	@classmethod
	def __subclasshook__(cls, C):
		if cls is Sized:
			if any("__len__" in B.__dict__ for B in C.__mro__):
				return True
	return NotImplemented  # See https://docs.python.org/3/library/constants.html
但是在你自己的 ABC 业务类中并不推荐使用 __subclasshook__,因为它太底层了,多用于 lib 设计中。
Chapter 12 - Inheritance: For Good or For Worse
本章谈两个问题:
- The pitfalls of subclassing from built-in types
- Multiple inheritance and the method resolution order
12.1 Subclassing Built-In Types Is Tricky
一个很微妙的问题:你无法确定底层函数的调用逻辑。举个例子,我们之前有说 getattr(obj, name) 的逻辑是先去取 obj.__getattribute__(name)。所以正常的想法是:我子类如果覆写了 __getattribute__,那么 getattr 作用在子类上的行为也会相应改变。但是实际情况是:getattr 不一定会实际调用 __getattribute__ (比如说有可能去调用公用的更底层的逻辑)。而且这个行为是 language-implementation-specific 的,所以有可能 PyPy 和 CPython 的逻辑还不一样。
Differences between PyPy and CPython » Subclasses of built-in types:
Officially, CPython has no rule at all for when exactly overridden method of subclasses of built-in types get implicitly called or not. As an approximation, these methods are never called by other built-in methods of the same object. For example, an overridden
__getitem__()in a subclass ofdictwill not be called by e.g. the built-inget()method.
Subclassing built-in types like dict or list or str directly is error-prone because the built-in methods mostly ignore user-defined overrides. Instead of subclassing the built-ins, derive your classes from the collections module using UserDict, UserList, and UserString, which are designed to be easily extended.
12.2 Multiple Inheritance and Method Resolution Order
首先 python 没有 C++: Virtual Inheritance 里的 dread diamond 问题,子类 D 定位到父类 A 的方法毫无压力,而且查找顺序是固定的–以 D.__mro__ 的顺序为准。
另外需要注意的是,等价于 instance.method(),Class.method(instance) 这种有点像 static 的写法的也是可行的:
>>> class Foo:
...     def bar(self):
...             print("bar")
...
>>> f = Foo()
>>> f.bar()
bar
>>> Foo.bar(f)
bar
所以可以衍生出 Base.method(ext) 这种写法,相当于在子类对象 ext 上调用父类 Base 的方法。当然更好的写法是在 Ext 里用 super().method()。
从上面这个例子出发,我们还可以引申出另外一个问题:既没有 self 参数也没有标注 @staticmethod 的方法是怎样的存在?
>>> class Foo:
...     def bar():
...             print("bar")
...     @staticmethod
...     def baz():
...             print("baz")
...
>>> f = Foo()
>>> f.bar()
Traceback (most recent call last):
  File "<stdin>", line 1, in <module>
TypeError: bar() takes 0 positional arguments but 1 was given
>>> f.baz()
baz
>>> Foo.bar()
bar
>>> Foo.baz()
baz
可见:
- 对成员方法
bar:f.bar()会无脑转换成Foo.bar(f)- 所以如果不给
bar定一个self参数的话,它就不可能成为一个成员方法,而是成了一个 ”只能通过Foo访问的” static 方法
- 所以如果不给
- 对 static 方法
baz:f.baz()转换成Foo.baz()这是顺理成章的
12.3 Coping with Multiple Inheritance
- Distinguish Interface Inheritance from Implementation Inheritance
- Make Interfaces Explicit with ABCs
- Use Mixins for Code Reuse
- Conceptually, a mixin does not define a new type; it merely bundles methods for reuse.
- A mixin should never be instantiated, and concrete classes should not inherit only from a mixin.
- Eachs mixin should provide a single specific behavior, implementing few and very closely related methods.
- Make Mixins Explicit by Naming
- An ABC May Also Be a Mixin; The Reverse Is Not True
- Don’t Subclass from More Than One Concrete Class
- Provide Aggregate Classes to Users
- If some combination of ABCs or mixins is particularly useful to client code, provide a class that brings them together in a sensible way. Grady Booch calls this an aggregate class.
- “Favor Object Composition Over Class Inheritance.”
- Universally true.
Chapter 13 - Operator Overloading: Doing It Right
13.1 Operator Overloading 101
Python limitation on operator overloading:
- We cannot overload operators for the built-in types.
- We cannot create new operators, only overload existing ones.
- A few operators can’t be overloaded:
is,and,or,not(but the bitwise&,|,~, can).
13.2 Unary Operators
+$\Rightarrow$__pos__-$\Rightarrow$__neg__~$\Rightarrow$__invert__- Bitwise inverse of an integer, defined as
~x == -(x+1)
- Bitwise inverse of an integer, defined as
abs$\Rightarrow$__abs__
When implementing, always return a new object instead of modifying self.
13.3 + for Vector Addition
import itertools

def __add__(self, other):
	pairs = itertools.zip_longest(self, other, fillvalue=0.0)
	return Vector(a + b for a, b in pairs)
zip_longest这个是见识到了!这么一来 length 不同的 Vector 也可以相加了other没有类型限制,但是要注意这么一来有个加法顺序的问题:Vector([1, 2]) + (3, 4)是 OK 的,等同于v.__add__((3, 4))- 反过来
(3, 4) + Vector([1, 2])就不行,因为 tuple 的__add__处理不了 Vector- 而且 tuple 的加法是被设计成 concat 的,
(1, 2) + (3, 4) == (1, 2, 3, 4)
- 而且 tuple 的加法是被设计成 concat 的,
To support operations involving objects of different types, Python implements a special dispatching mechanism for the infix operator special methods. Given an expression a + b, the interpreter will perform these steps:
- Call
a.__add__(b). - If
adoesn’t have__add__, or calling it returnsNotImplemented, callb.__radd__(a).__radd__means “reflected”, “reversed” or “right” version of__add__- 同理还有
__rsub__
- If
bdoesn’t have__radd__, or calling it returnsNotImplemented, raiseTypeErrorwith anunsupported operand typesmessage.
所以加一个 __radd__ 就可以解决 (3, 4) + Vector([1, 2]) 的问题:
def __radd__(self, other):
	return self + other
注意这里的逻辑:tuple.__add__(vector) $\Rightarrow$ vector.__radd__(tuple) $\Rightarrow$ vector.__add__(tuple)。
另外一个需要注意的是:如何规范地 return NotImplemented?示范代码:
def __add__(self, other):
	try:
		pairs = itertools.zip_longest(self, other, fillvalue=0.0)
		return Vector(a + b for a, b in pairs)
	except TypeError:
		return NotImplemented
13.4 * for Scalar Multiplication
这里我们限制一下乘数的类型:
import numbers

def __mul__(self, scalar):
	if isinstance(scalar, numbers.Real):
		return Vector(n * scalar for n in self)
	else:
		return NotImplemented

def __rmul__(self, scalar):
	return self * scalar
Digress: @ for Matrix Multiplication since Python 3.5
>>> import numpy as np
>>> va = np.array([1, 2, 3])
>>> vb = np.array([5, 6, 7])
>>> va @ vb  # 1*5 + 2*6 + 3*7
38
>>> va.dot(vb)
38
Digress: __ixxx__ Series In-place Operators
比如 a += 2 其实就是 a.__iadd__(2)。
另外注意 python 没有 a++ 和 ++a 这样的操作
13.5 Rich Comparison Operators

reverse 的逻辑还是一样的:如果 a.__eq__(b) 行不通就调用 b.__eq__(a)。需要注意 type checking 的情景,因为有可能存在继承关系:
- 比如
ext.__eq__(base) == False因为isinstace(base, Ext) == False - 此时反过来跑去调用
base.__eq__(ext),结果isintace(ext, Base) == True,而且后续的比较也都 OK,最后还是返回了True - 相当于强行要求你考虑 reflexivity 自反性
13.6 Augmented Assignment Operators
If a class does not implement the in-place operators, the augmented assignment operators are just syntactic sugar: a += b is evaluated exactly as a = a + b. That’s the expected behavior for immutable types, and if you have __add__ then += will work with no additional code.
- The in-place special methods should never be implemented for immutable types like our
Vectorclass.
As the name says, these in-place operators are expected to change the lefthand operand in place, and not create a new object as the result.
Part V - Control Flow
Chapter 14 - Iterables, Iterators, and Generators
一篇很好的 blog 以供参考:nvie.com: Iterables vs. Iterators vs. Generators

14.1 Sentence Take #1: A Sequence of Words
import re
import reprlib

RE_WORD = re.compile('\w+')

class Sentence:
	def __init__(self, text):
		self.text = text
		self.words = RE_WORD.findall(text)

	def __getitem__(self, index):
		return self.words[index]

	def __len__(self):
		return len(self.words)

	def __repr__(self):
		return 'Sentence(%s)' % reprlib.repr(self.text)
Whenever the interpreter needs to iterate over an object x, it automatically calls iter(x). It runs like:
- Call
x.__iter__()to obtain an iterator. - If
__iter__()is not implemented inx, Python tries to create an iterator that attempts to fetch items in order, usingx.__getitem__() - If that fails too, Python raises
TypeError, usually saying “Xobject is not iterable”.
所以即使 python sequence 类没有实现 __iter__,它们自带的 __getitem__ 也能保证它们是 iterable 的。
另外,collections.abc.Iterable 在它的 __subclasshook__ 中认定:所有实现了 __iter__ 的类都是 collections.abc.Iterable 的子类
14.2 Iterables Versus Iterators
Any object from which the iter() built-in function can obtain an iterator is an iterable.
The standard interface for an iterator has two methods:
__next__- Returns the next available item, raising
StopIterationwhen there are no more items.
- Returns the next available item, raising
__iter__- Returns
self; this allows iterators to be used where an iterable is expected, for example, in a for loop. - 根据 iterable 的定义,iterator 本身也是 iterable
- Returns
for i in seq:
	do_something(i)

# ----- Is Equivalent To ----- #

it = iter(seq)

while True:
	try:
		i = next(it)
		do_something(i)
	except StopIteration:
		del it
		break

# Once exhausted, an iterator becomes useless.
# To go over the seq again, a new iterator must be built.
14.3 Sentence Take #2: A Classic Iterator
import re
import reprlib

RE_WORD = re.compile('\w+')

class Sentence:
	def __init__(self, text):
		self.text = text
		self.words = RE_WORD.findall(text)

	def __repr__(self):
		return 'Sentence(%s)' % reprlib.repr(self.text)

	def __iter__(self):
		return SentenceIterator(self.words)

class SentenceIterator:
	def __init__(self, words):
		self.words = words
		self.index = 0

	def __next__(self):
		try:
			word = self.words[self.index]
		except IndexError:
			raise StopIteration()
		self.index += 1
		return word

	def __iter__(self):
		return self
14.4 Sentence Take #3: A Generator Function
import re
import reprlib

RE_WORD = re.compile('\w+')

class Sentence:
	def __init__(self, text):
		self.text = text
		self.words = RE_WORD.findall(text)

	def __repr__(self):
		return 'Sentence(%s)' % reprlib.repr(self.text)

	def __iter__(self):
		for word in self.words:
			yield word
		# return  # Not necessary

# done!
Any Python function that has the yield keyword in its body is a generator function: a function which, when called, returns a generator object. In other words, a generator
function is a generator factory.
Suppose generator function gen() returns a generator object g by g = gen(). When we invoke next(g), execution advances to the next yield in the gen() function body, and the next(g) call evaluates to the value yielded when the gen() is suspended. Finally, when gen() returns, g raises StopIteration, in accordance with the Iterator protocol.
14.5 Sentence Take #4: A Lazy Implementation
Nowadays, laziness is considered a good trait, at least in programming languages and APIs. A lazy implementation postpones producing values to the last possible moment. This saves memory and may avoid useless processing as well. (与 lazy evaluation 对应的是 eager evaluation)
importimportre
reprlib

RE_WORD = re.compile('\w+')

class Sentence:
	def __init__(self, text):
		self.text = text

	def __repr__(self):
		return 'Sentence(%s)' % reprlib.repr(self.text)

	def __iter__(self):
		for match in RE_WORD.finditer(self.text):
			yield match.group()
N.B. Whenever you are using Python 3 and start wondering “Is there a lazy way of doing this?”, often the answer is “Yes.”
14.6 Sentence Take #5: A Generator Expression
A generator expression can be understood as a lazy version of a listcomp.
import re
import reprlib

RE_WORD = re.compile('\w+')

class Sentence:
	def __init__(self, text):
		self.text = text

	def __repr__(self):
		return 'Sentence(%s)' % reprlib.repr(self.text)

	def __iter__(self):
		return (match.group() for match in RE_WORD.finditer(self.text))
Generator expressions are syntactic sugar: they can always be replaced by generator functions, but sometimes are more convenient.
Syntax Tip: When a generator expression is passed as the single argument to a function or constructor, you don’t need to write its parentheses.
>>> (i * 5 for i in range(1, 5))
<generator object <genexpr> at 0x7f54bf32cdb0>
>>> list(i * 5 for i in range(1, 5))
[5, 10, 15, 20]
>>> list((i * 5 for i in range(1, 5)))
[5, 10, 15, 20]
14.7 Generator Functions in the Standard Library
参 Python Documentation: 10.1. itertools — Functions creating iterators for efficient looping
14.7.1 Create Generators Yielding Filtered Data
itertools.compress(Iterable data, Iterable mask): 类似于 numpy 的data[mask],只是返回结果是一个 generator- E.g.
compress([1, 2, 3], [True, False, True])returns a generator ofyield 1; yield 3
- E.g.
itertools.dropwhile(Function condition, Iterable data):dropxindatawhilecondition(x) == True; return a generator from the leftover indata- E.g.
dropwhile(lambda x: x <= 2, [1, 2, 3, 2, 1])returns a generator ofyield 3; yield 2; yield 1
- E.g.
itertools.takewhile(Function condition, Iterable data): yieldxindatawhilecondition(x) == True; stop yielding immediately oncecondition(x) == False- E.g.
takewhile(lambda x: x <= 2, [1, 2, 3, 2, 1])returns a generator ofyield 1; yield 2
- E.g.
- (built-in)
filter(Function condition, Iterable data): yieldxindataifcondition(x) == True itertools.filterfalse(Function condition, Iterable data): yieldxindataifcondition(x) == Falseitertools.islice(Iterable data[, start], stop[, step]): return a generator fromdata[start: stop: step]
def compress(data, mask):
    # compress('ABCDEF', [1,0,1,0,1,1]) --> A C E F
    return (d for d, m in zip(data, m) if m)

def dropwhile(condition, iterable):
    # dropwhile(lambda x: x<5, [1,4,6,4,1]) --> 6 4 1
    iterable = iter(iterable)
    for x in iterable:
        if not condition(x):
            yield x
            break
    for x in iterable:
        yield x

def takewhile(condition, iterable):
    # takewhile(lambda x: x<5, [1,4,6,4,1]) --> 1 4
    for x in iterable:
        if condition(x):
            yield x
        else:
            break

def filterfalse(condition, iterable):
    # filterfalse(lambda x: x%2, range(10)) --> 0 2 4 6 8
	# 相当于 lambda x: x%2 == 1 == True
    if condition is None:
        condition = bool
    for x in iterable:
        if not condition(x):
            yield x
14.7.2 Create Generators Yielding Mapped Data
itertools.accumulate(Iterable data, Function f = operator.add: yield $x_1, \operatorname f(x_2, x_1), \operatorname f(x_3, \operatorname f(x_2, x_1)), \dots$ for $x_i$ indata- (built-in)
enumerate(Iterable data, start=0): yield(i+start, data[i])foriinrange(0, len(data)) - (built-in)
map(Function f, Iterable data_1, ..., Iterable data_n): yieldf(x_1, ..., x_n)for(x_1, ..., x_n)inzip(data_1, ..., data_n) itertools.starmap(Function f, Iterable data): yieldf(*i)foriindata
def accumulate(iterable, func=operator.add):
    'Return running totals'
    # accumulate([1,2,3,4,5]) --> 1 3 6 10 15
    # accumulate([1,2,3,4,5], operator.mul) --> 1 2 6 24 120
    it = iter(iterable)
    try:
        total = next(it)
    except StopIteration:
        return
    yield total
    for element in it:
        total = func(total, element)
        yield total

def starmap(function, iterable):
    # starmap(pow, [(2,5), (3,2), (10,3)]) --> 32 9 1000
    for args in iterable:
        yield function(*args)
14.7.3 Create Generators Yielding Merged Data
itertools.chain(Iterable A, ..., Iterable Z): yield $a_1, \dots, a_{n_A}, b_1, \dots, y_{n_Y}, z_1, \dots, z_{n_Z}$itertools.chain.from_iterable(Iterable data):== itertools.chain(*data)- (built-in)
zip(Iterable A, ..., Iterable Z): 参 Python: Zip itertools.zip_longest(Iterable A, ..., Iterable Z, fillvalue=None): 你理解了zip的话看这个函数名自然就明白它的功能了
def chain(*iterables):
    # chain('ABC', 'DEF') --> A B C D E F
    for it in iterables:
        for element in it:
            yield element

def from_iterable(iterables):
    # chain.from_iterable(['ABC', 'DEF']) --> A B C D E F
    for it in iterables:
        for element in it:
            yield element

class ZipExhausted(Exception):
    pass

def zip_longest(*args, **kwds):
    # zip_longest('ABCD', 'xy', fillvalue='-') --> Ax By C- D-
    fillvalue = kwds.get('fillvalue')
    counter = len(args) - 1
    def sentinel():
        nonlocal counter
        if not counter:
            raise ZipExhausted
        counter -= 1
        yield fillvalue
    fillers = repeat(fillvalue)
    iterators = [chain(it, sentinel(), fillers) for it in args]
    try:
        while iterators:
            yield tuple(map(next, iterators))
    except ZipExhausted:
        pass
14.7.4 Create Generators Yielding Repetition
itertools.count(start=0, step=1): yield $\text{start}, \text{start}+\text{step}, \text{start}+2 \cdot \text{step}, \dots$ endlesslyitertools.repeat(object x[, ntimes]): yieldxendlessly orntimestimesitertools.cycle(Iterable data): yield $x_1, \dots, x_n, x_1, \dots, x_n, x_1, \dots$ repeatedly and endlessly for $x_i$ indata
def count(start=0, step=1):
    # count(10) --> 10 11 12 13 14 ...
    # count(2.5, 0.5) -> 2.5 3.0 3.5 ...
    n = start
    while True:
        yield n
        n += step

def repeat(object, times=None):
    # repeat(10, 3) --> 10 10 10
    if times is None:
        while True:
            yield object
    else:
        for i in range(times):
            yield object

def cycle(iterable):
    # cycle('ABCD') --> A B C D A B C D A B C D ...
    saved = []
    for element in iterable:
        yield element
        saved.append(element)
    while saved:
        for element in saved:
              yield element
注意这两种 repeat a list 的方式:
>>> from itertools import chain, repeat
>>> import numpy as np
>>> list(chain(*repeat([1, 2, 3], 3)))
[1, 2, 3, 1, 2, 3, 1, 2, 3]
>>> np.repeat([1, 2, 3], 3).tolist()
[1, 1, 1, 2, 2, 2, 3, 3, 3]
14.7.5 Create Generators Yielding Combinations and Permutations
itertools.product(Iterable A, ..., Iterable Z, repeat=1): yield all $(a_i, b_j, \dots, z_k)$ where $a_i \in A, b_j \in B, \dots, z_k \in Z$- 一共会 yield $(\vert A \vert \cdot \vert B \vert \cdot \ldots \cdot \vert Z \vert)^{\text{repeat}}$ 个 tuple
repeat=2的效果是 yield all $(a_{i_1}, b_{j_1}, \dots, z_{k_1}, a_{i_2}, b_{j_2}, \dots, z_{k_2})$,依此类推- 还有一种用法是
product(A, repeat=2),等价于product(A, A)
itertools.combinations(Iterable X, k): yield all $(x_{i_1}, x_{i_2}, \dots, x_{i_k})$ where $x_{i_j} \in X$ and $i_1 < i_2 < \dots < i_k$itertools.combinations_with_replacement(Iterable X, k): yield all $(x_{i_1}, x_{i_2}, \dots, x_{i_k})$ where $x_{i_j} \in X$ and $i_1 \leq i_2 \leq \dots \leq i_k$itertools.permutations(Iterable X, k): yield all $(x_{i_1}, x_{i_2}, \dots, x_{i_k})$ where $x_{i_j} \in X$ and $i_1 \neq i_2 \neq \dots \neq i_k$
>>> import itertools
>>> list(itertools.combinations([1,2,3], 2))
[(1, 2), (1, 3), (2, 3)]
>>> list(itertools.combinations_with_replacement([1,2,3], 2))
[(1, 1), (1, 2), (1, 3), (2, 2), (2, 3), (3, 3)]
>>> list(itertools.permutations([1,2,3], 2))
[(1, 2), (1, 3), (2, 1), (2, 3), (3, 1), (3, 2)]
>>> list(itertools.product([1,2,3], repeat=2))
[(1, 1), (1, 2), (1, 3), (2, 1), (2, 2), (2, 3), (3, 1), (3, 2), (3, 3)]
假设 len(list(X)) = n,那么:
combinations一共会 yield $\operatorname{C}_{n}^{k} = {n \choose k} = \frac{n!}{(n-k)!k!}$ 个 tuplecombinations_with_replacement一共会 yield $\operatorname{C}_{n+k-1}^{k} = {n+k-1 \choose k} = \frac{(n+k-1)!}{(n-1)!k!}$ 个 tuplepermutations一共会 yield $\operatorname{A}_{n}^{k} = \frac{n!}{(n-k)!}$ 个 tuple- 你可能会问 “为啥没有 permutation with replacement 操作?” which yields $n^k$ tuples
- 因为可以用
product(X, repeat=k)实现
- 因为可以用
def product(*args, repeat=1):
    # product('ABCD', 'xy') --> Ax Ay Bx By Cx Cy Dx Dy
    # product(range(2), repeat=3) --> 000 001 010 011 100 101 110 111

	# E.g. product('ABCD', 'xy')
	# pools = [('A', 'B', 'C', 'D'), ('x', 'y')]
    pools = [tuple(pool) for pool in args] * repeat
    result = [[]]
    for pool in pools:
		# When pool = ('A', 'B', 'C', 'D')
		# 	result = [['A'], ['B'], ['C'], ['D']]
		# Then pool = ('x', 'y')
		# 	result = [['A', 'x'], ['A', 'y'], ['B', 'x'], ['B', 'y'], ['C', 'x'], ['C', 'y'], ['D', 'x'], ['D', 'y']]
		# `x+[y]` 里 x 是 list of list 的元素; y 被包装成了 list。这里利用了 list extension 来实现了一个类似集合 ∪ 的效果
        result = [x+[y] for x in result for y in pool]
    for prod in result:
        yield tuple(prod)

def combinations(iterable, r):
    # combinations('ABCD', 2) --> AB AC AD BC BD CD
    # combinations(range(4), 3) --> 012 013 023 123

	# E.g. combinations('ABCD', 2)
	# pool = [('A', 'B', 'C', 'D')]
    pool = tuple(iterable)
    n = len(pool)  # == 4
    if r > n:
        return
    indices = list(range(r))  # == [0, 1]
    yield tuple(pool[i] for i in indices)  # yield pool(0,1)

	while True:
        for i in reversed(range(r)):  # for i in [1, 0]
			# 1st round: i == 1; indices[1] == 1 != 1 + 4 - 2; break
			# 2nd round: i == 1; indices[1] == 2 != 1 + 4 - 2; break
			# 3rd round: i == 1; indices[1] == 3 == 1 + 4 - 2; continue
			# 3rd round: i == 0; indices[0] == 0 != 0 + 4 - 2; break
			# 4th round: i == 1; indices[1] == 2 != 1 + 4 - 2; break
			# 5th round: i == 1; indices[1] == 3 == 1 + 4 - 2; continue
			# 5th round: i == 0; indices[0] == 1 != 0 + 4 - 2; break
			# 6th round: i == 1; indices[1] == 3 == 1 + 4 - 2; continue
			# 6th round: i == 0; indices[0] == 2 == 1 + 4 - 2; continue
            if indices[i] != i + n - r:
                break
		# for-else 你可以理解成 for 执行完接了一个 finally
		# 	然而 java 并没有 for-finally,只有 try-finally (不要 catch)
		# 6th round ended
        else:
            return

		# 1st round: i == 1; indices[1] == 2
		# 2nd round: i == 1; indices[1] == 3
		# 3rd round: i == 0; indices[0] == 1
		# 4th round: i == 1; indices[1] == 3
		# 5th round: i == 0; indices[0] == 2
        indices[i] += 1
		# 1st round: i == 1; for j in []
		# 2nd round: i == 1; for j in []
		# 3rd round: i == 0; for j in [1]
		# 			 indices[1] = indices[0] + 1 == 2
		# 4th round: i == 1; for j in []
		# 5th round: i == 0; for j in [1]
		# 			 indices[1] = indices[0] + 1 == 3
        for j in range(i+1, r):
            indices[j] = indices[j-1] + 1
		# 1st round: i == 1; yield pool(0,2)
		# 2nd round: i == 1; yield pool(0,3)
		# 3rd round: i == 0; yield pool(1,2)
		# 4th round: i == 1; yield pool(1,3)
		# 5th round: i == 0; yield pool(2,3)
        yield tuple(pool[i] for i in indices)

def combinations_with_replacement(iterable, r):
    # combinations_with_replacement('ABC', 2) --> AA AB AC BB BC CC
    pool = tuple(iterable)
    n = len(pool)
    if not n and r:
        return
    indices = [0] * r
    yield tuple(pool[i] for i in indices)
    while True:
        for i in reversed(range(r)):
            if indices[i] != n - 1:
                break
        else:
            return
        indices[i:] = [indices[i] + 1] * (r - i)
        yield tuple(pool[i] for i in indices)

def permutations(iterable, r=None):
    # permutations('ABCD', 2) --> AB AC AD BA BC BD CA CB CD DA DB DC
    # permutations(range(3)) --> 012 021 102 120 201 210
    pool = tuple(iterable)
    n = len(pool)
    r = n if r is None else r
    if r > n:
        return
    indices = list(range(n))
    cycles = list(range(n, n-r, -1))
    yield tuple(pool[i] for i in indices[:r])
    while n:
        for i in reversed(range(r)):
            cycles[i] -= 1
            if cycles[i] == 0:
                indices[i:] = indices[i+1:] + indices[i:i+1]
                cycles[i] = n - i
            else:
                j = cycles[i]
                indices[i], indices[-j] = indices[-j], indices[i]
                yield tuple(pool[i] for i in indices[:r])
                break
        else:
            return
如果允许用现有的函数,也可以这样实现:
def combinations(iterable, r):
    pool = tuple(iterable)
    n = len(pool)
    for indices in permutations(range(n), r):
        if sorted(indices) == list(indices):
            yield tuple(pool[i] for i in indices)

def combinations_with_replacement(iterable, r):
    pool = tuple(iterable)
    n = len(pool)
    for indices in product(range(n), repeat=r):
        if sorted(indices) == list(indices):
            yield tuple(pool[i] for i in indices)

def permutations(iterable, r=None):
    pool = tuple(iterable)
    n = len(pool)
    r = n if r is None else r
    for indices in product(range(n), repeat=r):
        if len(set(indices)) == r:
            yield tuple(pool[i] for i in indices)
14.7.6 Create Generators Yielding Rearranged Data
itertools.groupby(Iterable X, key=None)- If
keyisNone, setkey = lambda x: x(identity function) - If $\operatorname{key}(x_i) = \operatorname{key}(x_j) = \dots = \operatorname{key}(x_k) = \kappa$, put $x_i, x_j, \dots, x_k$ into a
itertools._grouperobject $\psi$ (which itself is also a generator). Then yield a tuple $(\kappa, \psi(x_i, x_j, \dots, x_k))$ - Yield all such tuples
- If
- (built-in)
reversed(seq): Return a reverse iterator.seqmust be an object which has a__reversed__()method- OR
- supports the sequence protocol (the
__len__()method and the__getitem__()method with integer arguments starting at 0).
itertools.tee(Iterable X, n=2): return a tuple ofnindependentiter(X)- E.g. when
n=3, return a tuple(iter(X), iter(X), iter(X))
- E.g. when
class groupby:
    # [k for k, g in groupby('AAAABBBCCDAABBB')] --> A B C D A B
    # [list(g) for k, g in groupby('AAAABBBCCD')] --> AAAA BBB CC D
    def __init__(self, iterable, key=None):
        if key is None:
            key = lambda x: x
        self.keyfunc = key
        self.it = iter(iterable)
        self.tgtkey = self.currkey = self.currvalue = object()

    def __iter__(self):
        return self

    def __next__(self):
        while self.currkey == self.tgtkey:
            self.currvalue = next(self.it)    # Exit on StopIteration
            self.currkey = self.keyfunc(self.currvalue)
        self.tgtkey = self.currkey
        return (self.currkey, self._grouper(self.tgtkey))

    def _grouper(self, tgtkey):
        while self.currkey == tgtkey:
            yield self.currvalue
            try:
                self.currvalue = next(self.it)
            except StopIteration:
                return
            self.currkey = self.keyfunc(self.currvalue)

def tee(iterable, n=2):
    it = iter(iterable)
    deques = [collections.deque() for i in range(n)]

    def gen(mydeque):
        while True:
            if not mydeque:             # when the local deque is empty
                try:
                    newval = next(it)   # fetch a new value and
                except StopIteration:
                    return
                for d in deques:        # load it to all the deques
                    d.append(newval)
            yield mydeque.popleft()

    return tuple(gen(d) for d in deques)
注意这个 tee 的实现:它并不是简单地返回 (iter(X), iter(X), ...)
- 首先要牢记的是,你在接收
tee返回值的时候,gen是没有执行的!因为 iteration 还没有开始。当 iteration 开始的时候,gen才开始执行- 比如
a, b, c = tee([1,2,3], 3)时,gen没有执行,只是挂到这三个变量上了而已 - 如果你来一句
list(a),那么 iteration 就开始了,gen也就开始执行了
- 比如
a, b, c = tee([1,2,3], 3)时:a -> deque([])b -> deque([])c -> deque([])
- 第一次
next(a)时:a -> deque([1]), 然后 yield1,最终a -> deque([])b -> deque([1])c -> deque([1])
- 第二次
next(a)时:a -> deque([2]), 然后 yield2,最终a -> deque([])b -> deque([1, 2])c -> deque([1, 2])
- 如果此时
next(b):a -> deque([3])b -> deque([1, 2, 3]),然后 yield1,最终b -> deque([2, 3])c -> deque([1, 2, 3])
- 可见每次某个 deque yield 一个新值,它就给其他所有的 deque 都 append 这么一个新值
14.8 New Syntax in Python 3.3: yield from
这里只介绍了最简单最直接的用法:yield from iterable 等价于 for i in iterable: yield i。所以 chain 的实现可以简写一下:
def chain(*iterables):
	for it in iterables:
		for i in it:
			yield i

def chain(*iterables):
	for it in iterables:
		yield from it
Besides replacing a loop, yield from creates a channel connecting the inner generator directly to the client of the outer generator. This channel becomes really important when generators are used as coroutines and not only produce but also consume values from the client code. 我们 16 章再深入讨论。
14.9 Iterable Reducing Functions
all(Iterable X): 注意all([])是Trueany(Iterable X): 注意any([])是Falsemax(Iterable X[, key=,][default=]): return $x_i$ which maximizes $\operatorname{key}(x_i)$; ifXis empty, returndefault- May also be invoked as
max(x1, x2, ...[, key=?])
- May also be invoked as
min(Iterable X[, key=,][default=]): return $x_i$ which minimizes $\operatorname{key}(x_i)$; ifXis empty, returndefault- May also be invoked as
min(x1, x2, ...[, key=?])
- May also be invoked as
sum(Iterable X, start=0): returnssum(X) + start- Use
math.fsum()for better precision when adding floats
- Use
functools.reduce(Function f, Iterable X[, initial]- If
initialis not given:- $r_1 = \operatorname{f}(x_1, x_2)$
- $r_2 = \operatorname{f}(r_1, x_3)$
- $r_3 = \operatorname{f}(r_2, x_4)$
- 依此类推
- return $r_{n-1}$ if $\vert X \vert = n$
- If
initial = ais given:- $r_1 = \operatorname{f}(a, x_1)$
- $r_2 = \operatorname{f}(r_1, x_2)$
- $r_3 = \operatorname{f}(r_2, x_3)$
- 依此类推
- return $r_{n}$ if $\vert X \vert = n$
- If
14.10 A Closer Look at the iter Function
As we’ve seen, Python calls iter(x) when it needs to iterate over an object x.
But iter has another trick: it can be called with two arguments to create an iterator from a regular function or any callable object. In this usage, the first argument must be a callable to be invoked repeatedly (with no arguments) to yield values, and the second argument is a sentinel: a marker value which, when returned by the callable, causes the iterator to raise StopIteration instead of yielding the sentinel.
The following example shows how to use iter to roll a six-sided die until a 1 is rolled:
>>> def d6():
... 	return randint(1, 6)
...
>>> d6_iter = iter(d6, 1)
>>> d6_iter
<callable_iterator object at 0x00000000029BE6A0>
>>> for roll in d6_iter:
... 	print(roll)
...
4
3
6
3
Another useful example to read lines from a file until a blank line is found or the end of file is reached:
with open('mydata.txt') as fp:
	for line in iter(fp.readline, ''):
		process_line(line)
14.11 Generators as Coroutines
PEP 342 – Coroutines via Enhanced Generators was implemented in Python 2.5. This proposal added extra methods and functionality to generator objects, most notably the .send() method.
Like gtr.__next__(), gtr.send() causes the generator to advance to the next yield, but it also allows the client using the generator to send data into it: whatever argument is passed to .send() becomes the value of the corresponding yield expression inside the generator function body. In other words, .send() allows two-way data exchange between the client code and the generator–in contrast with .__next__(), which only lets the client receive data from the generator.
看例子
>>> def double_input():
...     while True:
...         x = yield
...         yield x * 2
...
>>> gen = double_input()
>>> next(gen)
>>> gen.send(10)
20
>>> next(gen)
>>> next(gen)
Traceback (most recent call last):
  File "<stdin>", line 1, in <module>
  File "<stdin>", line 4, in double_input
TypeError: unsupported operand type(s) for *: 'NoneType' and 'int'
>>> def add_inputs():
...     while True:
...         x = yield
...         y = yield
...         yield x + y
...
>>> gen = add_inputs()
>>> next(gen)
>>> gen.send(10)
>>> gen.send(20)
30
>>> gen = add_inputs()
>>> next(gen)
>>> gen.send(10)
>>> next(gen)
Traceback (most recent call last):
  File "<stdin>", line 1, in <module>
  File "<stdin>", line 5, in add_inputs
TypeError: unsupported operand type(s) for +: 'int' and 'NoneType'
以 add_input 为例:
next(gen),驱动到第一个yield,即执行到x = yield,停住gen.send(10),相当于执行了x = 10,然后驱动到下一个yield,即y = yield,停住gen.send(20),相当于执行了y = 20,然后驱动到下一个yield,即yield x + y,输出
所以大致的 pattern 是:
.__next__()和.send()都会驱动到一下个yield,不管是 left-handyield还是 right-handyield.send(foo)替换当前的 right-handyield为foo(然后驱动到下一个 yield)- 驱动到 right-hand
yield时直接输出 - 你一个循环里有 $N$ 个
yield,就要驱动 $N$ 次,i.e. $N_{\text{next}} + N_{\text{send}} = N_{\text{yield}}$
This is such a major “enhancement” that it actually changes the nature of generators: when used in this way, they become coroutines. David Beazley–probably the most prolific writer and speaker about coroutines in the Python community–warned in a famous PyCon US 2009 tutorial:
- Generators produce data for iteration
- Coroutines are consumers of data
- To keep your brain from exploding, you don’t mix the two concepts together
- Coroutines are not related to iteration
- Note: There is a use of having yield produce a value in a coroutine, but it’s not tied to iteration.
-- David Beazley
“A Curious Course on Coroutines and Concurrency”
Soapbox
Semantics of Generator Versus Iterator
A generator is an iterator; an iterator is not necessarily a generator.
Proof by code:
>>> from collections import abc
>>> e = enumerate('ABC')
>>> isinstance(e, abc.Iterator)
True
>>> import types
>>> e = enumerate('ABC')
>>> isinstance(e, types.GeneratorType)
False
Chapter 15 - Context Managers and else Blocks
15.1 Do This, Then That: else Blocks Beyond if
for-else: theelseblock will run if theforloop runs to completionelsewon’t run ifforis aborted by abreakorreturn
while-else: dittotry-else: theelseblock will run if no exception is raised in thetryblock
The use of else in loops generally follows the pattern of this snippet:
for item in my_list:
    if item.flavor == 'banana':
        break
else:
    raise ValueError('No banana flavor found!')
In Python, try-except is commonly used for control flow, and not just for error han‐ dling. There’s even an acronym/slogan for that documented in the official Python glos‐ sary:
EAFP
Easier to ask for forgiveness than permission. This common Python coding style assumes the existence of valid keys or attributes and catches exceptions if the as‐ sumption proves false. This clean and fast style is characterized by the presence of many try and except statements. The technique contrasts with the LBYL style common to many other languages such as C.
- 就是你很不喜欢用的 “用 try-except 去判断 object 是否具有某个性质”
- 比如:用
try len(obj)去判断obj是否是 sequence
- 比如:用
The glossary then defines LBYL:
LBYL
Look before you leap. This coding style explicitly tests for pre-conditions before making calls or lookups. This style contrasts with the EAFP approach and is characterized by the presence of many if statements. In a multi-threaded environment, the LBYL approach can risk introducing a race condition between “the looking” and “the leaping”. For example, the code,
if key in mapping: return mapping[key]can fail if another thread removes key from mapping after the test, but before the lookup. This issue can be solved with locks or by using the EAFP approach.
15.2 Context Managers and with Blocks
The with statement was designed to simplify the “try/finally” pattern, which guarantees that some operation is performed after a block of code, even if the block is aborted because of an exception, a return or sys.exit() call. The code in the “finally” clause usually releases a critical resource or restores some previous state that was temporarily changed.
The context manager protocol consists of the __enter__ and __exit__ methods. At the start of the with, __enter__ is invoked on the context manager object. The role of the “finally” clause is played by a call to __exit__ on the context manager object at the end of the with block.
__enter__(): No argument. Easy.__exit__(exc_type, exc_value, traceback): if an exception is raised insidewith, these three arguments get the exception data. 参:
15.3 The contextlib Utilities
参 Python Documentation: 29.6. contextlib — Utilities for with-statement contexts
15.4 Use @contextlib.contextmanager
直接作用于一个 generator function gen 上,将其包装成一个 context manager (不用你自己定义 class 然后实现 context manager 的 protocol)。但是要求这个 generator function 只能 yield 一个值出来,这个 yield 的值会赋给 with gen() as g 的 g,同时 gen() 的运行停止,yield 后面的代码在 with block 结束后继续运行。
如果 gen yield 了多个值,系统会抛一个 RuntimeError: generator didn't stop。
如果 with 结束时,__exit__ 检测到了异常,__exit__ 会调用 gen.throw(exc_value) 将异常抛到 gen 的 yield 后面。
from contextlib import contextmanager

@contextmanager
def gen():
    try:
        yield 'Foo'
    except ValueError as ve:
        print(ve)

with gen() as g:
    print(g)
    raise ValueError('Found Foo!')

# Output:
# 	Foo
#	Found Foo!
Soapbox
From Raymond Hettinger: What Makes Python Awesome (23:00 to 26:15):
Then–Hettinger told us–he had an insight: subroutines are the most important invention in the history of computer languages. If you have sequences of operations like
A;B;CandP;B;Q, you can factor outBin a subroutine. It’s like factoring out the filling in a sandwich: using tuna with different breads. But what if you want to factor out the bread, to make sandwiches with wheat bread, using a different filling each time? That’s what thewithstatement offers. It’s the complement of the subroutine.
Chapter 16 - Coroutines
We find two main senses for the verb “to yield” in dictionaries: to produce or to give way. Both senses apply in Python when we use the yield keyword in a generator. A line such as yield item produces a value that is received by the caller of next(...), and it also gives way, suspending the execution of the generator so that the caller may proceed until it’s ready to consume another value by invoking next() again. The caller pulls values from the generator.
A coroutine is syntactically like a generator: just a function with the yield keyword in its body. However, in a coroutine, yield usually appears on the right side of an expression (e.g., datum = yield), and it may or may not produce a value–if there is no expression after the yield keyword, the generator yields None. The coroutine may receive data from the caller, which uses .send(datum) instead of next(...) to feed the coroutine. Usually, the caller pushes values into the coroutine.
It is even possible that no data goes in or out through the yield keyword. Regardless of the flow of data, yield is a control flow device that can be used to implement cooperative multitasking: each coroutine yields control to a central scheduler so that other coroutines can be activated.
When you start thinking of yield primarily in terms of control flow, you have the mindset to understand coroutines.
16.1 How Coroutines Evolved from Generators
PEP 342 – Coroutines via Enhanced Generators added 3 methods to generators:
gen.send(x): allows the caller ofgento post dataxthat then becomes the value of theyieldexpression inside the generator function.- This allows a generator to be used as a coroutine: a procedure that collaborates with the caller, yielding and receiving values.
gen.throw(exc_type[, exc_value[, tb_obj]]): allows the caller ofgento throw an exception to be handled inside the generatorgen.close(): allows the caller ofgento terminate the generator
16.2 Basic Behavior of a Generator Used as a Coroutine
>>> def simple_coroutine():
...     print("-> coroutine started")
...     x = yield
...     print("-> coroutine received:", x)
...
>>> coro = simple_coroutine()
>>> coro
<generator object simple_coroutine at 0x7fec75c2e410>
>>> next(coro)
-> coroutine started
>>> coro.send(11)
-> coroutine received: 11
Traceback (most recent call last):
  File "<stdin>", line 1, in <module>
StopIteration
A coroutine can be in one of 4 states, which can be detected by inspect.getgeneratorstate(coro):
'GEN_CREATED': Waiting to start execution.- This is the state of
corojust aftercoro = simple_coroutine() - You can start
corobynext(coro)orcoro.send(None)- You cannot send a non-
Nonevalue to a just-started coroutine
- You cannot send a non-
- The inital call of
next(coro)is often described as priming the coroutine
- This is the state of
'GEN_RUNNING': Currently being executed by the interpreter.- You’ll only see this state in a multithreaded application or if the generator object calls
getgeneratorstateon itself.
- You’ll only see this state in a multithreaded application or if the generator object calls
'GEN_SUSPENDED': Currently suspended at ayieldexpression.'GEN_CLOSED': Execution has completed.
A much complicated example on a generator-coroutine hybrid:
>>> def simple_coroutine2(a):
...     print("-> Started: a = ", a)
...     b = yield a
...     print("-> After yield: a = ", a)
...     print("-> After yield: b = ", b)
...
>>> coro2 = simple_coroutine2(7)
>>> next(coro2)
-> Started: a =  7
7
>>> coro2.send(14)
-> After yield: a =  7
-> After yield: b =  14
Traceback (most recent call last):
  File "<stdin>", line 1, in <module>
StopIteration
>>>
这一句 b = yield a 相当于同一个 yield 连接了一个 block:{ yield a; b = yield },send() 对 a 的值没有任何影响。
16.3 Example: Coroutine to Compute a Running Average
def averager():
	total = 0.0
	count = 0
	average = None
	while True:
		term = yield average
		total += term
		count += 1
		average = total/count
>>> coro_avg = averager()
>>> next(coro_avg)
>>> coro_avg.send(10)
10.0
>>> coro_avg.send(30)
20.0
>>> coro_avg.send(5)
15.0
16.4 Decorators for Coroutine Priming
from functools import wraps

def coroutine(func):
	"""Decorator: primes `func` by advancing to first `yield`"""
	@wraps(func)
	def primer(*args,**kwargs):
		gen = func(*args,**kwargs)
		next(gen)
		return gen

	return primer

@coroutine
def averager():
	...
Then you can skip calling next() on coro_avg:
>>> coro_avg = averager()
>>> coro_avg.send(10)
10.0
>>> coro_avg.send(30)
20.0
>>> coro_avg.send(5)
15.0
The yield from syntax we’ll see later automatically primes the coroutine called by it, making it incompatible with decorators such as @coroutine. The asyncio.coroutine decorator from the Python 3.4 standard library is designed to work with yield from so it does not prime the coroutine.
16.5 Coroutine Termination and Exception Handling
generator.throw(exc_type[, exc_value[, tb_obj]])- Causes the
yieldexpression where the generator was paused to raise the exception given. - If the exception is handled by the generator, flow advances to the next
yield, and the value yielded becomes the value of thegenerator.throwcall.generatoritself is still working, state being'GEN_SUSPENDED'
- If the exception is not handled by the generator, it propagates to the context of the caller.
generatorwill be terminated with state'GEN_CLOSED'
- Causes the
generator.close()- Causes the
yieldexpression where the generator was paused to raise aGeneratorExitexception. - No error is reported to the caller if the generator does not handle that exception or raises
StopIteration–usually by running to completion. - When receiving a
GeneratorExit, the generator must notyielda value, otherwise aRuntimeErroris raised. - If any other exception is raised by the generator, it propagates to the caller.
- Causes the
16.6 Returning a Value from a Coroutine
from collections import namedtuple

Result = namedtuple('Result', 'count average')

def averager():
	total = 0.0
	count = 0
	average = None
	while True:
		term = yield
		if term is None:
			break
		total += term
		count += 1
		average = total/count
	return Result(count, average)
- In order to return a value, a coroutine must terminate normally; this is why we have a
breakin thewhile-loop.
>>> coro_avg = averager()
>>> next(coro_avg)
>>> coro_avg.send(10)
>>> coro_avg.send(30)
>>> coro_avg.send(6.5)
>>> coro_avg.send(None)
Traceback (most recent call last):
    ...
StopIteration: Result(count=3, average=15.5)
注意你不能用 result = coro_avg.send(None) 去接收 coroutine 的返回值。The value of the return expression is smuggled to the caller as an attribute, value, of the StopIteration exception. This is a bit of a hack, but it preserves the existing behavior of generator objects: raising StopIteration when exhausted. 所以正确的接收 coroutine 返回值的方式是:
>>> coro_avg = averager()
>>> next(coro_avg)
>>> coro_avg.send(10)
>>> coro_avg.send(30)
>>> coro_avg.send(6.5)
>>> try:
...     coro_avg.send(None)
... except StopIteration as exc:
...     result = exc.value
...
>>> result
Result(count=3, average=15.5)
16.7 Using yield from
yield from does so much more than yield that the reuse of the keyword is arguably misleading. Similar constructs in other languages are called await, and that is a much better name because it conveys some crucial points:
- When a generator
gencallsyield from subgen(), thesubgentakes over and will yield values to the caller ofgen - The caller will in effect drive
subgendirectly - Meanwhile
genwill be blocked, waiting untilsubgenterminates
A good example of yield from is in Recipe 4.14. Flattening a Nested Sequence in Beazley and Jones’s Python Cookbook, 3E (source code available on GitHub):
# Example of flattening a nested sequence using subgenerators

from collections import Iterable

def flatten(items, ignore_types=(str, bytes)):  # `ignore_types` is a good design!
    for x in items:
        if isinstance(x, Iterable) and not isinstance(x, ignore_types):
            yield from flatten(x)
        else:
            yield x

items = [1, 2, [3, 4, [5, 6], 7], 8]

# Produces 1 2 3 4 5 6 7 8
for x in flatten(items):
    print(x)
The real nature of yield from cannot be demonstrated with simple iterables; it requires the mind-expanding use of nested generators. That’s why PEP 380, which introduced yield from, is titled “Syntax for Delegating to a Subgenerator.” PEP 380 defines:
- delegating generator (delegatee): The generator function that contains the
yield from <iterable>expression. - subgenerator (delegator): The generator obtained from the
<iterable>part of theyield fromexpression. - caller (client): The client code that calls the delegating generator. (“client” might be better according to the book author)
from collections import namedtuple


Result = namedtuple('Result', 'count average')


# the subgenerator
def averager():
    total = 0.0
    count = 0
    average = None
    while True:
        term = yield
        if term is None:
            break
        total += term
        count += 1
        average = total/count
    return Result(count, average)


# the delegating generator
def grouper(results, key):
    while True:
        results[key] = yield from averager()


# the client code, a.k.a. the caller
def main(data):
    results = {}
    for key, values in data.items():
        group = grouper(results, key)
        next(group)
        for value in values:
            group.send(value)
        group.send(None) # important!

    # print(results)
    # uncomment to debug
    report(results)


# output report
def report(results):
    for key, result in sorted(results.items()):
        group, unit = key.split(';')
        print('{:2} {:5} averaging {:.2f}{}'.format(
            result.count, group, result.average, unit))


data = {
    'girls;kg': [40.9, 38.5, 44.3, 42.2, 45.2, 41.7, 44.5, 38.0, 40.6, 44.5],
    'girls;m': [1.6, 1.51, 1.4, 1.3, 1.41, 1.39, 1.33, 1.46, 1.45, 1.43],
    'boys;kg': [39.0, 40.8, 43.2, 40.8, 43.1, 38.6, 41.4, 40.6, 36.3],
    'boys;m': [1.38, 1.5, 1.32, 1.25, 1.37, 1.48, 1.25, 1.49, 1.46],
}

main(data)

# Output:
"""
 9 boys  averaging 40.42kg
 9 boys  averaging 1.39m
10 girls averaging 42.04kg
10 girls averaging 1.43m
"""
这个例子耍了一个 trick:因为 delegator 的 yield from 默认会处理 delegatee 的 StopIteration 而 client 需要自己去 try-except delegator 的 StopIteration,所以这里 grouper 就设计成了永远不 return,也就永远不会抛 StopIteration。不这么设计的话,下面这张图的 grouper 一样要传 StopIteration 给 main。

具体的执行过程中的细节,书上并没有讲得很细,可以参考:
- Python: Yes, coroutines are complicated, but they can be used as simply as generators
- Python: Put simply, generators are special coroutines
16.8 The Meaning of yield from
关于 yield、assignment 和 return value 的逻辑,讲得基本和你总结的差不多。这里补充一下异常的情况:
- Exceptions other than
GeneratorExitthrown into the delegator are passed to thethrow()method of the delegatee. If the call raisesStopIteration, the delegator is resumed. Any other exception is propagated to the delegator. - If a
GeneratorExitis thrown into the delegator, or theclose()method of the delegator is called, then theclose()method of the delegatee is called if it has one. If this call results in an exception, it is propagated to the delegator. Otherwise,GeneratorExitis raised in the delegator.
Consider that yield from appears in a delegator. The client code drives delegator, which drives the delegatee. So, to simplify the logic involved, let’s pretend the client doesn’t ever call .throw(...) or .close() on the delegator. Let’s also pretend the delegatee never raises an exception until it terminates, when StopIteration is raised by the interpreter. Then a simplified version of pseudocode explaining RESULT = yield from EXPR is:
_i = iter(EXPR)  # Coroutines are also generators and `iter(coro) == coro`
try:
	_y = next(_i)
except StopIteration as _e:
	_r = _e.value
else:
	while 1:
		_s = yield _y  # Delegator receives a value from client
		try:
			_y = _i.send(_s)  # Delegator re-sends this value to its delegatee
		except StopIteration as _e:
			_r = _e.value
		break

RESULT = _r
In this simplified pseudocode, the variable names used in the pseudocode published in PEP 380 are preserved. The variables are:
_i(iterator): The delegetee_y(yielded): A value yielded from the delegetee_r(result): The eventual result (i.e., the value of the yield from expression when the delegatee ends)_s(sent): A value sent by the caller to the delegating generator, which is forwarded to the delegatee_e(exception): An exception (always an instance ofStopIterationin this simplified pseudocode)
The full explanation in PEP 380 – Syntax for Delegating to a Subgenerator: Formal Semantics is:
"""
1. The statement

	`RESULT = yield from EXPR`

is semantically equivalent to
"""

_i = iter(EXPR)
try:
    _y = next(_i)
except StopIteration as _e:
    _r = _e.value
else:
    while 1:
        try:
            _s = yield _y
        except GeneratorExit as _e:
            try:
                _m = _i.close
            except AttributeError:
                pass
            else:
                _m()
            raise _e
        except BaseException as _e:
            _x = sys.exc_info()
            try:
                _m = _i.throw
            except AttributeError:
                raise _e
            else:
                try:
                    _y = _m(*_x)
                except StopIteration as _e:
                    _r = _e.value
                    break
        else:
            try:
                if _s is None:
                    _y = next(_i)
                else:
                    _y = _i.send(_s)
            except StopIteration as _e:
                _r = _e.value
                break

RESULT = _r


"""
2. In a generator, the statement

	`return value`

is semantically equivalent to

	`raise StopIteration(value)`

except that, as currently, the exception cannot be caught by except clauses within the returning generator.
"""


"""
3. The StopIteration exception behaves as though defined thusly:
"""

class StopIteration(Exception):
    def __init__(self, *args):
        if len(args) > 0:
            self.value = args[0]
        else:
            self.value = None
        Exception.__init__(self, *args)
You’re not meant to learn about it by reading the expansion—that’s only there to pin down all the details for language lawyers.
16.9 Use Case: Coroutines for Discrete Event Simulation
Coroutines are a natural way of expressing many algorithms, such as simulations, games, asynchronous I/O, and other forms of event-driven programming or co-operative multitasking.
-- Guido van Rossum and Phillip J. Eby
PEP 342—Coroutines via Enhanced Generators
Coroutines are the fundamental building block of the asyncio package. A simulation shows how to implement concurrent activities using coroutines instead of threads–and this will greatly help when we tackle asyncio with in Chapter 18.
16.9.1 Discrete Event Simulations
A discrete event simulation (DES) is a type of simulation where a system is modeled as a sequence of events. In a DES, the simulation “clock” does not advance by fixed increments, but advances directly to the simulated time of the next modeled event. For example, if we are simulating the operation of a taxi cab from a high-level perspective, one event is picking up a passenger, the next is dropping the passenger off. It doesn’t matter if a trip takes 5 or 50 minutes: when the drop off event happens, the clock is updated to the end time of the trip in a single operation. In a DES, we can simulate a year of cab trips in less than a second. This is in contrast to a continuous simulation where the clock advances continuously by a fixed–and usually small–increment.
Intuitively, turn-based games are examples of DESs: the state of the game only changes when a player moves, and while a player is deciding the next move, the simulation clock is frozen. Real-time games, on the other hand, are continuous simulations where the simulation clock is running all the time, the state of the game is updated many times per second, and slow players are at a real disadvantage.
16.9.2 The Taxi Fleet Simulation
In our simulation program, taxi_sim.py, a number of taxi cabs are created. Each will make a fixed number of trips and then go home. A taxi leaves the garage and starts “prowling”–looking for a passenger. This lasts until a passenger is picked up, and a trip starts. When the passenger is dropped off, the taxi goes back to prowling.
The time elapsed during prowls and trips is generated using an exponential distribution.
# In an Event instance,
# 	time is the simulation time when the event will occur (in minute),
# 	proc is the identifier of the taxi process instance, and
# 	action is a string describing the activity.
Event = collections.namedtuple('Event', 'time proc action')

def taxi_process(ident, trips, start_time=0):
	"""Yield to simulator issuing event at each state change"""
	time = yield Event(start_time, ident, 'leave garage')
	for i in range(trips):
		time = yield Event(time, ident, 'pick up passenger')
		time = yield Event(time, ident, 'drop off passenger')

	yield Event(time, ident, 'going home')
	# end of taxi process
>>> from taxi_sim import taxi_process
>>> taxi = taxi_process(ident=13, trips=2, start_time=0)
>>> next(taxi)
Event(time=0, proc=13, action='leave garage')
>>> taxi.send(_.time + 7)  # In the console, the `_` variable is bound to the last result
Event(time=7, proc=13, action='pick up passenger')
>>> taxi.send(_.time + 23)
Event(time=30, proc=13, action='drop off passenger')
>>> taxi.send(_.time + 5)
Event(time=35, proc=13, action='pick up passenger')
>>> taxi.send(_.time + 48)
Event(time=83, proc=13, action='drop off passenger')
>>> taxi.send(_.time + 1)
Event(time=84, proc=13, action='going home')
>>> taxi.send(_.time + 10)
Traceback (most recent call last):
File "<stdin>", line 1, in <module>
StopIteration
To instantiate the Simulator class, the main function of taxi_sim.py builds a taxis dictionary like this:
# DEPARTURE_INTERVAL == 5
taxis = {i: taxi_process(ident=i, trips=(i + 1) * 2, start_time=i * DEPARTURE_INTERVAL) for i in range(num_taxis)}

"""
If num_taxis = 3

	taxis = {0: taxi_process(ident=0, trips=2, start_time=0),
			 1: taxi_process(ident=1, trips=4, start_time=5),
			 2: taxi_process(ident=2, trips=6, start_time=10)}
"""
Priority queues are a fundamental building block of discrete event simulations: events are created in any order, placed in the queue, and later retrieved in order according to the scheduled time of each one. For example, the first two events placed in the queue may be:
Event(time=14, proc=0, action='pick up passenger')  # taxi 0 (start_time=0) would take 14 minutes to pick up his first passenger
Event(time=11, proc=1, action='pick up passenger')  # taxi 1 (start_time=10) would take 1 minute to pick up his first passenger
The second event holds higher priority because of shorter prowling time.
Code for Simulator class is:
class Simulator:
	def __init__(self, procs_map):
		self.events = queue.PriorityQueue()
		self.procs = dict(procs_map)

	def run(self, end_time):
		"""Schedule and display events until time is up"""
		# schedule the first event for each cab
		for _, proc in sorted(self.procs.items()):
			first_event = next(proc)  # yield 'leave garage' Event
			self.events.put(first_event)

		# main loop of the simulation
		sim_time = 0
		while sim_time < end_time:
			if self.events.empty():
				print('*** end of events ***')
				break

			current_event = self.events.get()
			sim_time, proc_id, previous_action = current_event
			print('taxi:', proc_id, proc_id * ' ', current_event)
			active_proc = self.procs[proc_id]
			next_time = sim_time + compute_duration(previous_action)  # Duaration is fixed for a given type of actions
			try:
				next_event = active_proc.send(next_time)
			except StopIteration:
				del self.procs[proc_id]
			else:
				self.events.put(next_event)  # Enqueue the next Event
		else:
			msg = '*** end of simulation time: {} events pending ***'
			print(msg.format(self.events.qsize()))

sim = Simulator(taxis)
sim.run(end_time)
Chapter 17 - Concurrency with Futures
This chapter focuses on the concurrent.futures library introduced in Python 3.2, but also available for Python 2.5 and newer as the futures package on PyPI.
Here I also introduce the concept of futures–objects representing the asynchronous execution of an operation.
17.1 Example: Web Downloads in Three Styles
To handle network I/O efficiently, you need concurrency, as it involves high latency–so instead of wasting CPU cycles waiting, it’s better to do something else until a response comes back from the network.
Three scripts will be shown below to download images of 20 country flags:
flags.py: runs sequentially. Only requests the next image when the previous one is downloaded and saved to diskflags_threadpool.py: requests all images practically at the same time. Usesconcurrent.futurespackageflags_asyncio.py: ditto. Usesasynciopackage
17.1.1 Style I: Sequential
import os
import time
import sys

import requests

POP20_CC = ('CN IN US ID BR PK NG BD RU JP '
            'MX PH VN ET EG DE IR TR CD FR').split()
BASE_URL = 'http://flupy.org/data/flags'
DEST_DIR = './'

def save_flag(img, filename):
    path = os.path.join(DEST_DIR, filename)
    with open(path, 'wb') as fp:
        fp.write(img)

def get_flag(cc):
    url = '{}/{cc}/{cc}.gif'.format(BASE_URL, cc=cc.lower())
    resp = requests.get(url)
    return resp.content

def show(text):
    print(text, end=' ')
    sys.stdout.flush()

def download_many(cc_list):
    for cc in sorted(cc_list):
        image = get_flag(cc)
        show(cc)
        save_flag(image, cc.lower() + '.gif')
    return len(cc_list)

def main(download_many):
    t0 = time.time()
    count = download_many(POP20_CC)
    elapsed = time.time() - t0
    msg = '\n{} flags downloaded in {:.2f}s'
    print(msg.format(count, elapsed))

main(download_many)
The requests library by Kenneth Reitz is available on PyPI and is more powerful and easier to use than the urllib.request module from the Python 3 standard library. In fact, requests is considered a model Pythonic API. It is also compatible with Python 2.6 and up, while the urllib2 from Python 2 was moved and renamed in Python 3, so it’s more convenient to use requests regardless of the Python version you’re targeting.
17.1.2 Style II: Concurrent with concurrent.features
from concurrent import futures
from flags import save_flag, get_flag, show, main

MAX_WORKERS = 20

def download_one(cc):
	image = get_flag(cc)
	show(cc)
	save_flag(image, cc.lower() + '.gif')
	return cc

def download_many(cc_list):
	workers = min(MAX_WORKERS, len(cc_list))

	"""
	The `executor.__exit__` method will call `executor.shutdown(wait=True)`,
	which will block until all threads are done.
	"""
	with futures.ThreadPoolExecutor(workers) as executor:
		res = executor.map(download_one, sorted(cc_list))

	return len(list(res))

main(download_many)
This is a common refactoring when writing concurrent code: turning the body of a sequential for loop into a function to be called concurrently.
17.1.3 Style III: Concurrent with asyncio
import asyncio
import aiohttp
from flags import BASE_URL, save_flag, show, main

@asyncio.coroutine
def get_flag(cc):
	url = '{}/{cc}/{cc}.gif'.format(BASE_URL, cc=cc.lower())
	resp = yield from aiohttp.request('GET', url)
	image = yield from resp.read()
	return image

@asyncio.coroutine
def download_one(cc):
	image = yield from get_flag(cc)
	show(cc)
	save_flag(image, cc.lower() + '.gif')
	return cc

def download_many(cc_list):
	loop = asyncio.get_event_loop()
	to_do = [download_one(cc) for cc in sorted(cc_list)]
	wait_coro = asyncio.wait(to_do)
	res, _ = loop.run_until_complete(wait_coro)
	loop.close()

	return len(res)

main(download_many)
Will cover it in next chapter.
17.1.4 What Are the Futures?
As of Python 3.4, there are two classes named Future in the standard library: concurrent.futures.Future and asyncio.Future. They serve the same purpose: an instance of either Future class represents a deferred computation that may or may not have completed. This is similar to the Deferred class in Twisted, the Future class in Tornado, and Promise objects in various JavaScript libraries.
Futures encapsulate pending operations so that they can be put in queues, their state of completion can be queried, and their results (or exceptions) can be retrieved when available.
- Client code should not create
Futureinstances: they are meant to be instantiated exclusively by the concurrency framework, be itconcurrent.futuresorasyncio. - Client code is not supposed to change the state of a future.
Future.done(): nonblocking and returns a bool to tell you whether the callable linked to this future has executed or notFuture.add_done_callback(func): Instead of asking whether a future is done, client code usually asks to be notified. If you addfuncas a done-callback to futuref,func(f)will be invoked whenfis done.Future.result(): returns the result of the callable linked to this future- In
concurrent.futures, callingf.result()will block the caller’s thread until the result is ready- You can also set a
timeoutargument to raise aTimeErroriffis not done within the specified time
- You can also set a
- In
asyncio,f.result()is non-blocking and the preferred way to get the result of futures is to useyield from–which doesn’t work withconcurrency.futures.Futureinstances.- No such
timeoutargument
- No such
- In
To get a practical look at futures, we can rewrite last example:
def download_many(cc_list):
	cc_list = cc_list[:5]
	with futures.ThreadPoolExecutor(max_workers=3) as executor:
		to_do = []
		for cc in sorted(cc_list):
			future = executor.submit(download_one, cc)
			to_do.append(future)
			msg = 'Scheduled for {}: {}'
			print(msg.format(cc, future))

	"""
	`as_completed` function takes an iterable of futures and
	returns an iterator that yields futures as they are done.
	"""
	results = []
	for future in futures.as_completed(to_do):
		res = future.result()
		msg = '{} result: {!r}'
		print(msg.format(future, res))
		results.append(res)

	return len(results)
Strictly speaking, none of the concurrent scripts we tested so far can perform downloads in parallel. The concurrent.futures examples are limited by the Global Interpreter Lock (GIL), and the flags_asyncio.py is single-threaded.
17.2 Blocking I/O and the GIL
参 Python GIL: Global Interpreter Lock
When we write Python code, we have no control over the GIL, but a built-in function or an extension written in C can release the GIL while running time-consuming tasks. In fact, a Python library coded in C can manage the GIL, launch its own OS threads, and take advantage of all available CPU cores. This complicates the code of the library considerably, and most library authors don’t do it.
However, all standard library functions that perform blocking I/O release the GIL when waiting for a result from the OS. This means Python programs that are I/O bound can benefit from using threads at the Python level: while one Python thread is waiting for a response from the network, the blocked I/O function releases the GIL so another thread can run.
17.3 Launching Processes with concurrent.futures
The package enables truly parallel computations because it can distribute work among multiple Python processes (using the ProcessPoolExecutor class)–thus bypassing the GIL and leveraging all available CPU cores, if you need to do CPU-bound processing.
def download_many(cc_list):
	workers = min(MAX_WORKERS, len(cc_list))
	with futures.ThreadPoolExecutor(workers) as executor:

def download_many(cc_list):
	with futures.ProcessPoolExecutor() as executor:
There is an optional argument in ProcessPoolExecutor constructor, but most of the time we don’t use it–the default is the number of CPUs returned by os.cpu_count(). This makes sense: for CPU-bound processing, it makes no sense to ask for more workers than CPUs.
There is no advantage in using a ProcessPoolExecutor for the flags download example or any I/O-bound job.
17.4 Experimenting with executor.map
The simplest way to run several callables concurrently is with the executor.map function.
from time import sleep, strftime
from concurrent import futures

def display(*args):
	print(strftime('[%H:%M:%S]'), end=' ')
	print(*args)

def loiter(n):
	msg = '{}loiter({}): doing nothing for {}s...'
	display(msg.format('\t'*n, n, n))
	sleep(n)
	msg = '{}loiter({}): done.'
	display(msg.format('\t'*n, n))
	return n * 10

def main():
	display('Script starting.')
	executor = futures.ThreadPoolExecutor(max_workers=3)
	results = executor.map(loiter, range(5))
	display('results:', results)
	display('Waiting for individual results:')
	for i, result in enumerate(results):  # Note here
		display('result {}: {}'.format(i, result))

main()
The enumerate call in the for loop will implicitly invoke next(results), which in turn will invoke _f.result() on the (internal) _f future representing the first call, loiter(0). The result method will block until the future is done, therefore each iteration in this loop will have to wait for the next result to be ready.
The executor.map function is easy to use but it has a feature that may or may not be helpful, depending on your needs: it returns the results exactly in the same order as the calls are started: if the first call takes 10s to produce a result, and the others take 1s each, your code will block for 10s as it tries to retrieve the first result of the generator returned by map. After that, you’ll get the remaining results without blocking because they will be done. That’s OK when you must have all the results before proceeding, but often it’s preferable to get the results as they are ready, regardless of the order they were submitted. To do that, you need a combination of the executor.submit method and the futures.as_completed function.
The combination of executor.submit and futures.as_completed is more flexible than executor.map because you can submit different callables and arguments, while executor.map is designed to run the same callable on the different arguments. In addition, the set of futures you pass to futures.as_completed may come from more than one executor–perhaps some were created by a ThreadPoolExecutor instance while others are from a ProcessPoolExecutor.
17.5 Downloads with Progress Display and Error Handling
一个完整的例子,用到了 tqdm,需要架设 Mozilla Vaurien,略。
17.5.3 threading and multiprocessing
threading 和 multiprocessing 都是底层 module,concurrent.features 可以看做是 multiprocessing 的包装,提供了简单的接口,屏蔽了底层技术细节
Chapter 18 - Concurrency with asyncio
Concurrency is about dealing with lots of things at once.
Parallelism is about doing lots of things at once.
Not the same, but related.
One is about structure, one is about execution.
Concurrency provides a way to structure a solution to solve a problem that may (but not necessarily) be parallelizable.
-- Rob Pike
This chapter introduces asyncio, a package that implements concurrency with corou‐ tines driven by an event loop.
Because it uses yield from expressions extensively, asyncio is incompatible with older versions before Python 3.3.
18.1 Thread Versus Coroutine: A Comparison
Here we introduce a fun example to display an animated spinner made with the ASCII characters |/-\ on the console while some long computation is running.
import threading
import itertools
import time
import sys


class Signal:
	go = True

def spin(msg, signal):
	write, flush = sys.stdout.write, sys.stdout.flush
	for char in itertools.cycle('|/-\\'):
		status = char + ' ' + msg
		write(status)
		flush()
		write('\x08' * len(status))
		time.sleep(.1)
		if not signal.go:
			break
	write(' ' * len(status) + '\x08' * len(status))

def slow_function():
	# pretend waiting a long time for I/O
	time.sleep(3)  # Calling `sleep` would block the `main` thread, but GIL will be released to `spin` thread
	return 42

def supervisor():
	signal = Signal()
	spinner = threading.Thread(target=spin, args=('thinking!', signal))
	print('spinner object:', spinner)
	spinner.start()
	result = slow_function()
	signal.go = False
	spinner.join()
	return result

def main():
	result = supervisor()
	print('Answer:', result)

main()
- Note that, by design, there is no API for terminating a thread in Python. You must send it a message to shut down.
Now let’s see how the same behavior can be achieved with an @asyncio.coroutine instead of a thread.
import asyncio
import itertools
import sys


@asyncio.coroutine  # ①
def spin(msg):
	write, flush = sys.stdout.write, sys.stdout.flush
	for char in itertools.cycle('|/-\\'):
		status = char + ' ' + msg
		write(status)
		flush()
		write('\x08' * len(status))
		try:
			yield from asyncio.sleep(.1)  # ②
		except asyncio.CancelledError:
			break
	write(' ' * len(status) + '\x08' * len(status))

@asyncio.coroutine
def slow_function():
	# pretend waiting a long time for I/O
	yield from asyncio.sleep(3)
	return 42

@asyncio.coroutine  # ③
def supervisor():
	spinner = asyncio.async(spin('thinking!'))  # ④
	print('spinner object:', spinner)
	result = yield from slow_function()  # ⑤
	spinner.cancel()  # ⑥
	return result

def main():
	loop = asyncio.get_event_loop()
	result = loop.run_until_complete(supervisor())  # ⑦
	loop.close()
	print('Answer:', result)

main()
- ① Coroutines intended for use with
asyncioshould be decorated with@asyn cio.coroutine. This not mandatory, but is highly advisable.- It makes the coroutines stand out among regular functions, and helps with debugging by issuing a warning when a coroutine is garbage collected without being yielded from–which means some operation was left unfinished and is likely a bug.
- This is not a priming decorator.
- ② Use
yield from asyncio.sleep(.1)instead of justtime.sleep(.1), to sleep without blocking the event loop.- Never use
time.sleep(...)inasynciocoroutines unless you want to block the main thread, therefore freezing the event loop and probably the whole application as well. - If a coroutine needs to spend some time doing nothing, it should
yield from asyn cio.sleep(DELAY).
- Never use
- ③
supervisoris now a coroutine as well, so it can driveslow_functionwithyield from. - ④
asyncio.async(...)schedules thespincoroutine to run, wrapping it in aTaskobject, which is returned immediately. - ⑤ Drive the
slow_function(). When that is done, get the returned value. Meanwhile, the event loop will continue running becauseslow_functionultimately usesyield from asyncio.sleep(3)to hand control back to the main loop. - ⑥ A
Taskobject can be cancelled; this raisesasyncio.CancelledErrorat theyieldline where the coroutine is currently suspended. - ⑦ Drive the
supervisorcoroutine to completion; the return value of the coroutine is the return value of this call.- Just imagine that
loop.run_until_completeis callingnext()or.send()onsupervisor()
- Just imagine that
Here is a summary of the main differences to note between the two supervisor implementations:
- An
asyncio.Taskis roughly the equivalent of athreading.Thread. - A
Taskdrives a coroutine, and aThreadinvokes a callable. - You don’t instantiate
Taskobjects yourself, you get them by passing a coroutine toasyncio.async(...)orloop.create_task(...). - When you get a
Taskobject, it is already scheduled to run (e.g., byasyn cio.async); aThreadinstance must be explicitly told to run by calling itsstartmethod.
18.1.1 asyncio.Future: Nonblocking by Design
In asyncio, BaseEventLoop.create_task(...) takes a coroutine, schedules it to run, and returns an asyncio.Task instance–which is also an instance of asyncio.Future because Task is a subclass of Future designed to wrap a coroutine. This is analogous to how we create concurrent.futures.Future instances by invoking Executor.submit(...).
In asyncio.Future, the .result() method takes no arguments, so you can’t specify a timeout. Also, if you call .result() and the future is not done, it does not block waiting for the result. Instead, an asyncio.InvalidStateError is raised.
However, the usual way to get the result of an asyncio.Future is to yield from it, which automatically takes care of waiting for it to finish, without blocking the event loop–because in asyncio, yield from is used to give control back to the event loop.
Note that using yield from with a future is the coroutine equivalent of the functionality offered by add_done_callback: instead of triggering a callback, when the delayed operation is done, the event loop sets the result of the future, and the yield from expression produces a return value inside our suspended coroutine, allowing it to resume.
- So basically you won’t call
my_future.result()normy_future.add_done_callback(...)withasyncio.Future
18.1.2 Yielding from Futures, Tasks, and Coroutines
In asyncio, there is a close relationship between futures and coroutines because you can get the result of an asyncio.Future by yielding from it. This means that res = yield from foo() works
- if
foois a coroutine function or - if
foois a plain function that returns aFutureorTaskinstance.
In order to execute, a coroutine must be scheduled, and then it’s wrapped in an asyncio.Task. Given a coroutine, there are two main ways of obtaining a Task:
asyncio.async(coro_or_future, *, loop=None)- If
coro_or_futureis aFutureorTask,coro_or_futurewill be returned unchanged. - If
coro_or_futureis a coroutine,loop.create_task(...)will be called on it to create aTask- If
loopis not passed in,loop = asyncio.get_event_loop()
- If
- If
BaseEventLoop.create_task(coro)
Several asyncio functions accept coroutines and wrap them in asyncio.Task objects automatically, using asyncio.async internally. One example is BaseEventLoop.run_until_complete(...).
18.2 Downloading with asyncio and aiohttp
Previously we used requests library, which performs blocking I/O. To leverage asyncio, we must replace every function that hits the network with an asynchronous version that is invoked with yield from. And that’s why we use aiohttp here.
import asyncio
import aiohttp
from flags import BASE_URL, save_flag, show, main


@asyncio.coroutine
def get_flag(cc):
	url = '{}/{cc}/{cc}.gif'.format(BASE_URL, cc=cc.lower())
	resp = yield from aiohttp.request('GET', url)
	image = yield from resp.read()
	return image

@asyncio.coroutine
def download_one(cc):
	image = yield from get_flag(cc)
	show(cc)
	save_flag(image, cc.lower() + '.gif')  # ①
	return cc

def download_many(cc_list):
	loop = asyncio.get_event_loop()
	to_do = [download_one(cc) for cc in sorted(cc_list)]
	wait_coro = asyncio.wait(to_do)  # ②
	res, _ = loop.run_until_complete(wait_coro)  # ③
	loop.close()
	return len(res)

main(download_many)
- ① For maximum performance, the
save_flagoperation should be asynchronous, butasynciodoes not provide an asynchronous filesystem API at this time. - ② Despite its name,
waitis not a blocking function. It’s a coroutine that completes when all the coroutines passed to it are done. - ③ To drive the coroutine created by
wait, we pass it toloop.run_until_complete(...)- When
wait_corocompletes, it returns a tuple where the first item is the set of completed futures and the second is the set of those not completed.
- When
There are a lot of new concepts to grasp in asyncio but the overall logic is easy to follow if you employ a trick suggested by Guido van Rossum himself: squint (look at someone or something with one or both eyes partly closed in an attempt to see more clearly or as a reaction to strong light) and pretend the yield from keywords are not there. If you do that, you’ll notice that the code is as easy to read as plain old sequential code.
Using the yield from foo syntax avoids blocking because the current coroutine is suspended, but the control flow goes back to the event loop, which can drive other coroutines. When the foo future or coroutine is done, it returns a result to the suspended coroutine, resuming it.
18.3 Running Circling Around Blocking Calls
There are two ways to prevent blocking calls to halt the progress of the entire application:
- Run each blocking operation in a separate thread.
- Turn every blocking operation into a nonblocking asynchronous call.
There is a memory overhead for each suspended coroutine, but it’s orders of magnitude smaller than the overhead for each thread.
18.4 Enhancing the asyncio downloader Script
18.4.1 Using asyncio.as_completed
import asyncio
import collections
import aiohttp
from aiohttp import web
import tqdm
from flags2_common import main, HTTPStatus, Result, save_flag


# default set low to avoid errors from remote site, such as
# 503 - Service Temporarily Unavailable
DEFAULT_CONCUR_REQ = 5
MAX_CONCUR_REQ = 1000

class FetchError(Exception):
	def __init__(self, country_code):
		self.country_code = country_code

@asyncio.coroutine
def get_flag(base_url, cc):
	url = '{}/{cc}/{cc}.gif'.format(base_url, cc=cc.lower())
	resp = yield from aiohttp.request('GET', url)
	if resp.status == 200:
		image = yield from resp.read()
		return image
	elif resp.status == 404:
		raise web.HTTPNotFound()
	else:
		raise aiohttp.HttpProcessingError( code=resp.status, message=resp.reason, headers=resp.headers)

@asyncio.coroutine
def download_one(cc, base_url, semaphore, verbose):
	try:
		with (yield from semaphore):  # ①
			image = yield from get_flag(base_url, cc)  # ②
	except web.HTTPNotFound:
		status = HTTPStatus.not_found
		msg = 'not found'
	except Exception as exc:
		raise FetchError(cc) from exc
	else:
		save_flag(image, cc.lower() + '.gif')
		status = HTTPStatus.ok
		msg = 'OK'

	if verbose and msg:
		print(cc, msg)

	return Result(status, cc)

@asyncio.coroutine
def downloader_coro(cc_list, base_url, verbose, concur_req):
	counter = collections.Counter()  # ③
	semaphore = asyncio.Semaphore(concur_req)
	to_do = [download_one(cc, base_url, semaphore, verbose) for cc in sorted(cc_list)]

	to_do_iter = asyncio.as_completed(to_do)  # ④
	if not verbose:
		to_do_iter = tqdm.tqdm(to_do_iter, total=len(cc_list))  # ⑤
	for future in to_do_iter:  # ⑥
		try:
			res = yield from future  # ⑦
		except FetchError as exc:
			country_code = exc.country_code
			try:
				error_msg = exc.__cause__.args[0]
			except IndexError:
				error_msg = exc.__cause__.__class__.__name__
			if verbose and error_msg:
				msg = '*** Error for {}: {}'
				print(msg.format(country_code, error_msg))
				status = HTTPStatus.error
		else:
			status = res.status

		counter[status] += 1

	return counter

def download_many(cc_list, base_url, verbose, concur_req):
	loop = asyncio.get_event_loop()
	coro = downloader_coro(cc_list, base_url, verbose, concur_req)
	counts = loop.run_until_complete(coro)
	loop.close()
	return counts

main(download_many, DEFAULT_CONCUR_REQ, MAX_CONCUR_REQ)
- ① A
semaphoreis used as a context manager in ayield fromexpression so that the system as whole is not blocked: only this coroutine is blocked while thesemaphorecounter is at the maximum allowed number.- A
semaphoreis an object that holds an internal counter that is decremented whenever we call the.acquire()coroutine method on it, and incremented when we call the.release()coroutine method. - Calling
.acquire()does not block when the counter is greater than 0, but if the counter is 0,.acquire()will block the calling coroutine until some other coroutine calls.release()on the samesemaphore, thus incrementing the counter.
- A
- ② When this
withstatement exits, thesemaphorecounter is increased, unblocking some other coroutine instance that may be waiting for the samesemaphoreobject.- Network client code of the sort we are studying should always use some throttling mechanism to avoid pounding the server with too many concurrent requests–the overall performance of the system may degrade if the server is overloaded.
- ③ A
Counteris adictsubclass for counting hashable objects, e.g.Counter('AAABB') == Counter({'A': 3, 'B': 2}) - ④
asyncio.as_completedtakes a list of coroutines and returns an iterator that yields the coroutines in the order in which they are completed, so that when you iterate on it, you get each result as soon as it’s available. - ⑤ 这里用
tqdm包一下是为了给 ⑥ 的时候显示一下进度 - ⑥ Iterate over the completed futures
- ⑦
as_completedrequires you to loop over the returned completed futures and yield from each one of them to retrieve the result instead of callingfuture.result().
18.4.2 Using an Executor to Avoid Blocking the Event Loop
In the Python community, we tend to overlook the fact that local filesystem access is blocking, rationalizing that it doesn’t suffer from the higher latency of network access.
Recall that save_flag performs disk I/O and in flags2_asyncio.py, it blocks the single thread our code shares with the asyncio event loop. Therefore the whole application freezes while the file is being saved. The solution to this problem is the run_in_executor method of the event loop object.
Behind the scenes, the asyncio event loop has a thread pool executor, and you can send callables to be executed by it with run_in_executor.
@asyncio.coroutine
def download_one(cc, base_url, semaphore, verbose):
	try:
		with (yield from semaphore):
			image = yield from get_flag(base_url, cc)
	except web.HTTPNotFound:
		status = HTTPStatus.not_found
		msg = 'not found'
	except Exception as exc:
		raise FetchError(cc) from exc
	else:
		loop = asyncio.get_event_loop()
		loop.run_in_executor(None, save_flag, image, cc.lower() + '.gif')
		status = HTTPStatus.ok
		msg = 'OK'

	if verbose and msg:
		print(cc, msg)

	return Result(status, cc)
- The first argument to
run_in_executoris an executor instance; ifNone, the default thread pool executor of the event loop is used. - The remaining arguments are the callable and its positional arguments.
18.5 From Callbacks to Futures and Coroutines
略
18.6 Writing asyncio Servers
略
Part VI - Metaprogramming
Chapter 19 - Dynamic Attributes and Properties
The crucial importance of properties is that their existence makes it perfectly safe and indeed advisable for you to expose public data attributes as part of your class’s public interface.
-- Alex Martelli
Data attributes and methods are collectively known as attributes in Python: a method is just an attribute that is callable. Besides data attributes and methods, we can also create properties, which can be used to replace a public data attribute with accessor methods (i.e., getter/setter), without changing the class interface. This agrees with the Uniform access principle:
All services offered by a module should be available through a uniform notation, which does not betray whether they are implemented through storage or through computation.
19.1 Data Wrangling with Dynamic Attributes
19.1.1 Exploring JSON-Like Data with Dynamic Attributes
Consider a dict-like JSON object, feed. The syntax feed['Schedule']['events'][40] ['name'] is cumbersome. How can we just write feed.Schedule.events[40].name to fetch the same attribute?
We construct a FrozenJSON class so that feed = FrozenJSON(feed) could transform feed into an object with “dynamic attributes”.
from collections import abc


class FrozenJSON:
	"""A read-only façade for navigating a JSON-like object
	using attribute notation
	"""
	def __init__(self, mapping):
		self.__data = dict(mapping)

	def __getattr__(self, name):
		if hasattr(self.__data, name):
			return getattr(self.__data, name)
		else:
			return FrozenJSON.build(self.__data[name])

	@classmethod
	def build(cls, obj):
		if isinstance(obj, abc.Mapping):
			return cls(obj)
		elif isinstance(obj, abc.MutableSequence):
			return [cls.build(item) for item in obj]
		else:
			return obj
19.1.2 The Invalid Attribute Name Problem
比如 feed.class,因为 class 是关键字,所以这一句会是 syntax error。
- 方案一:用
getattr(feed, "class") - 方案二:把名字是 keyword 的 key 改名
def __init__(self, mapping):
	self.__data = {}
	for key, value in mapping.items():
		if keyword.iskeyword(key):  # `keyword` is a built-in module
			key += '_'
			self.__data[key] = value
同理还有 invalid identifier 的问题,比如 feed.2be,同样也是 syntax error。解决方案类似上面方案二,可以用 key.isidentifier() 来判断 key 是否是合法 identifier,不过这里要给 key 改名的话就只能靠你自己发挥了。
19.1.3 Flexible Object Creation with __new__
from collections import abc


class FrozenJSON:
	"""A read-only façade for navigating a JSON-like object
	using attribute notation
	"""

	def __new__(cls, arg):
		if isinstance(arg, abc.Mapping):
			return super().__new__(cls)
		elif isinstance(arg, abc.MutableSequence):
			return [cls(item) for item in arg]
		else:
			return arg

	def __init__(self, mapping):
		self.__data = {}
		for key, value in mapping.items():
			if iskeyword(key):
				key += '_'
			self.__data[key] = value

	def __getattr__(self, name):
		if hasattr(self.__data, name):
			return getattr(self.__data, name)
		else:
			return FrozenJSON(self.__data[name])
19.1.4 Restructuring the OSCON Feed with shelve
The funny name of the standard shelve module makes sense when you realize that pickle is the name of the Python object serialization format. Because pickle jars are kept in shelves, it makes sense that shelve provides pickle storage.
- shelve: [verb] to place on a shelf
The shelve.open high-level function returns a shelve.Shelf instance–a simple key- value object database backed by the dbm module, with these characteristics:
shelve.Shelfsubclassesabc.MutableMapping, so it provides the essential methods we expect of a mapping type- In addition,
shelve.Shelfprovides a few other I/O management methods, likesyncandclose; it’s also a context manager. - Keys and values are saved whenever a new value is assigned to a key.
- The keys must be strings.
- The values must be objects that the
picklemodule can handle.
We will read all records from the JSON file and save them to a shelve.Shelf. Each key will be made from the record type and the serial number (e.g., ‘event.33950’ or ‘speaker.3471’) and the value will be an instance of a new Record class we are about to introduce.
import warnings
import osconfeed


DB_NAME = 'data/schedule1_db'
CONFERENCE = 'conference.115'

class Record:
	def __init__(self, **kwargs):
		# Updating an instance __dict__ with a mapping is a quick way to create a bunch of attributes in that instance
		self.__dict__.update(kwargs)

def load_db(db):
	raw_data = osconfeed.load()
	warnings.warn('loading ' + DB_NAME)
	for collection, rec_list in raw_data['Schedule'].items():
		record_type = collection[:-1]
		for record in rec_list:
			key = '{}.{}'.format(record_type, record['serial'])
			record['serial'] = key
			db[key] = Record(**record)
>>> import shelve
>>> db = shelve.open(DB_NAME)
>>> if CONFERENCE not in db:
...     load_db(db)
...
>>> speaker = db['speaker.3471']
>>> type(speaker)
<class 'schedule1.Record'>
>>> speaker.name, speaker.twitter
('Anna Martelli Ravenscroft', 'annaraven')
>>> db.close()
19.1.5 Linked Record Retrieval with Properties
略
19.2 Using a Property for Attribute Validation
19.2.1 LineItem Take #1: Class for an Item in an Order
class LineItem:
	def __init__(self, description, weight, price):
		self.description = description
		self.weight = weight
		self.price = price

	def subtotal(self):
		return self.weight * self.price
How to handle negative weights and prices?
19.2.2 LineItem Take #2: A Validating Property
class LineItem:
	def __init__(self, description, weight, price):
		self.description = description
		self.weight = weight
		self.price = price

	def subtotal(self):
		return self.weight * self.price

	@property
	def weight(self):
		return self.__weight

	@weight.setter
	def weight(self, value):
		if value > 0:
			self.__weight = value
		else:
			raise ValueError('value must be > 0')
19.3 A Proper Look at Properties
Although often used as a decorator @property, the property built-in is actually a class. @property(func) is actually calling property constructor.
See 8.4.1 Digress: @property / __getattribute__() / __get__()
19.3.1 Properties Override Instance Attributes
略。书上的例子不可复制。
19.3.2 Property Documentation
If used with the classic call syntax, property can get the documentation string as the doc argument:
weight = property(get_weight, set_weight, doc='weight in kilograms')
When property is deployed as a decorator, the docstring of the getter method–the one with the @property decorator itself–is used as the documentation of the property as a whole.
19.4 Coding a Property Factory
We’ll create a quantity property factory below to avoid the @property repetitions.
def quantity(storage_name):
	def qty_getter(instance):
		return instance.__dict__[storage_name]

	def qty_setter(instance, value):
		if value > 0:
			instance.__dict__[storage_name] = value
		else:
			raise ValueError('value must be > 0')

	return property(qty_getter, qty_setter)

class LineItem:
	weight = quantity('weight')
	price = quantity('price')

	def __init__(self, description, weight, price):
		self.description = description
		self.weight = weight
		self.price = price

	def subtotal(self):
		return self.weight * self.price
19.5 Handling Attribute Deletion
In a property definition, the @member.deleter decorator is used to wrap the def member(self) method in charge of del my_obj.member.
If you are not using a property, attribute deletion can also be handled by implementing the lower-level __delattr__ special method.
19.6 Essential Attributes and Functions for Attribute Handling
略
Chapter 20 - Attribute Descriptors
A descriptor is a class that implements a protocol consisting of the __get__, __set__, and __delete__ methods. The property class implements the full descriptor protocol. As usual with protocols, partial implementations are OK. In fact, most descriptors we see in real code implement only __get__ and __set__, and many implement only one of these methods.
20.1 Descriptor Example: Attribute Validation
As we saw in 19.4 Coding a Property Factory, a property factory is a way to avoid repetitive coding of getters and setters by applying functional programming patterns. A property factory is a higher-order function that creates a parameterized set of accessor functions and builds a custom property instance from them, with closures to hold settings like the storage_name. The object-oriented way of solving the same problem is a descriptor class.
20.1.1 LineItem Take #3: A Simple Descriptor
class Quantity:
	def __init__(self, storage_name):
		self.storage_name = storage_name

	def __set__(self, instance, value):
		if value > 0:
			instance.__dict__[self.storage_name] = value  # ①
		else:
			raise ValueError('value must be > 0')

class LineItem:
	weight = Quantity('weight')
	price = Quantity('price')

	def __init__(self, description, weight, price):
		self.description = description
		self.weight = weight
		self.price = price

	def subtotal(self):
		return self.weight * self.price
- ① Here, we must handle the managed instance
__dict__directly; trying to use thesetattrbuilt-in would trigger the__set__method again, leading to infinite recursion..priceis called “managed attribute” and.__dict__['price']“storage attribute”.
- ① The logic here is:
line_item.price = 0$\Rightarrow$price.__set__(line_item, 0)
20.1.2 LineItem Take #4: Automatic Storage Attribute Names
A drawback of the above example is the need to repeat the names of the attributes when the descriptors are instantiated in the managed class body. Here we come up with a new solution.
class Quantity:
	__counter = 0

	def __init__(self):
		cls = self.__class__
		prefix = cls.__name__
		index = cls.__counter
		self.storage_name = '_{}#{}'.format(prefix, index)
		cls.__counter += 1

	def __get__(self, instance, owner):  # ①
		return getattr(instance, self.storage_name)  # ②

	def __set__(self, instance, value):
		if value > 0:
			setattr(instance, self.storage_name, value)  # ②
		else:
			raise ValueError('value must be > 0')

class LineItem:
	weight = Quantity()
	price = Quantity()

	def __init__(self, description, weight, price):
		self.description = description
		self.weight = weight
		self.price = price

	def subtotal(self):
		return self.weight * self.price
- ① The
ownerargument of__get__is a reference to the managed class (LineItemhere), and it’s handy when the descriptor is used to get attributes from the class.- When you retrieve attributes from the class, e.g.
LineItem.price,instanceargument of__get__will be set toNone
- When you retrieve attributes from the class, e.g.
- ② Here we can use the higher-level
getattrandsetattrbuilt-ins to store the value–instead of resorting toinstance.__dict__–because the managed attribute (e.g..price) and the storage attribute (e.g..__dict__['_Quantity#1']) have different names, so callinggetattrorsetattron the storage attribute will not trigger the descriptor, avoiding the infinite recursion discussed in the previous example.
To support introspection and other metaprogramming tricks by the user, it’s a good practice to make __get__ return the descriptor instance when the managed attribute is accessed through the class.
def __get__(self, instance, owner):
	if instance is None:
		return self
	else:
		return getattr(instance, self.storage_name)
Usually we do not define a descriptor in the same module where it’s used, but in a separate utility module designed to be used across the application–even in many applications, if you are developing a framework.
20.1.3 LineItem Take #5: A New Descriptor Type
Because descriptors are defined in classes, we can leverage inheritance to reuse some of the code we have for new descriptors. That’s what we’ll do in the following section.
略
20.2 Overriding Versus Nonoverriding Descriptors
Recall that there is an important asymmetry in the way Python handles attributes.
- Reading an attribute through an instance normally returns the attribute defined in the instance, but if there is no such attribute in the instance, a class attribute will be retrieved.
- On the other hand, assigning to an attribute in an instance normally creates the attribute in the instance, without affecting the class at all.
We can observe that:
- Descriptor instances are actually class attributes,
- but are used as object attributes.
This asymmetry also affects descriptors, in effect creating two broad categories of descriptors depending on whether the __set__ method is defined.
20.2.1 Overriding Descriptor (a.k.a. Data Descriptor / Enforced Descriptor)
A descriptor that implements the __set__ method is called an overriding descriptor, because although it is a class attribute, a descriptor implementing __set__ will override attempts to assign to instance attributes.
20.2.2 Overriding Descriptor Without __get__
In this case, only writing is handled by the descriptor. Reading the descriptor through an instance will return the descriptor object itself (from the instance’s class) because there is no __get__ to handle that access. If a namesake (同名的) instance attribute is created with a new value via direct access to the instance __dict__, the __set__ method will still override further attempts to set that attribute, but reading that attribute will simply return the new value (from the instance), instead of returning the descriptor object (from the instance’s class). In other words, the instance attribute will shadow the descriptor, but only when reading.
20.2.3 Nonoverriding Descriptor (a.k.a. Nondata Descriptor / Shadowable Descriptor)
If a descriptor does not implement __set__, then it’s a nonoverriding descriptor. Setting an instance attribute with the same name will shadow the descriptor, rendering it ineffective for handling that attribute in that specific instance.
20.2.4 Overwriting a Descriptor in the Class
Regardless of whether a descriptor is overriding or not, it can be overwritten by assignment to the class, e.g. LineItem.price = 1.
This reveals another asymmetry regarding reading and writing attributes:
- Although the reading of a class attribute can be controlled by a descriptor with
__get__attached to the managed class, - the writing of a class attribute cannot be handled by a descriptor with
__set__attached to the same class.
In order to control the setting of attributes in a class, you have to attach descriptors to the class of the class–in other words, the metaclass. We’ll discuss this topic in Chapter 21.
20.3 Methods Are (Nonoverriding) Descriptors
A function within a class becomes a bound method because all user-defined functions have a __get__ method, therefore they operate as descriptors when attached to a class.
Similarly, we can observe that:
- Functions are actually class attributes,
- but are used as object attributes.
>>> class Foo():
...     def bar():
...             pass
...
>>> Foo.bar
<function Foo.bar at 0x7f60b61b3620>
>>> Foo().bar
<bound method Foo.bar of <__main__.Foo object at 0x7f60b689a7f0>>
As usual with descriptors, the __get__ of a function returns a reference to itself when the access happens through the managed class. But when the access goes through an instance, the __get__ of the function returns a bound method object: a callable that wraps the function and binds the managed instance (e.g., Foo()) to the first argument of the function (i.e., self), like the functools.partial function does.
So basically,
f = Foo()
f.bar()

# ----- IS EQUIVALENT TO ----- #

Foo.bar(f)

# ----- OR ----- #

f.__class__.bar(f)
The bound method object also has a __call__ method, which handles the actual invocation. This method calls the original function referenced in __func__, passing the __self__ attribute of the method as the first argument. That’s how the implicit binding of the conventional self argument works.
20.4 Descriptor Usage Tips
- Use property to Keep It Simple
- The
propertybuilt-in actually creates overriding descriptors implementing both__set__and__get__, even if you do not define a setter method. - The default
__set__of a property raisesAttributeError: can't set attribute, so a property is the easiest way to create a read-only attribute, avoiding the issue described next.
- The
- Read-only descriptors require
__set__- If you use a descriptor class to implement a read-only attribute, you must remember to code both
__get__and__set__, otherwise setting a namesake attribute on an instance will shadow the descriptor. - The
__set__method of a read-only attribute should just raiseAttributeErrorwith a suitable message.
- If you use a descriptor class to implement a read-only attribute, you must remember to code both
- Validation descriptors can work with
__set__only- In a descriptor designed only for validation, the
__set__method should check the value argument it gets, and if valid, set it directly in the instance__dict__using the descriptor instance name as key. - That way, reading the attribute with the same name from the instance will be as fast as possible, because it will not require a
__get__.
- In a descriptor designed only for validation, the
- Caching can be done efficiently with
__get__only- If you code just the
__get__method, you have a nonoverriding descriptor. These are useful to make some expensive computation and then cache the result by setting an attribute by the same name on the instance. The namesake instance attribute will shadow the descriptor, so subsequent access to that attribute will fetch it directly from the instance__dict__and not trigger the descriptor__get__anymore.
- If you code just the
- Nonspecial methods can be shadowed by instance attributes
- However, this issue does not interfere with special methods. The interpreter only looks for special methods in the class itself, in other words,
repr(x)is executed asx.__class__.__repr__(x), so a redefinedx.__repr__attribute has no effect onrepr(x).
- However, this issue does not interfere with special methods. The interpreter only looks for special methods in the class itself, in other words,
Chapter 21 - Class Metaprogramming
Class metaprogramming is the art of creating or customizing classes at runtime.
21.1 A Class Factory
We create a record_factory to mimic collections.namedtuple.
def record_factory(cls_name, field_names):
    try:
        field_names = field_names.replace(',', ' ').split()
    except AttributeError:  # no `.replace` or `.split`
        pass  # assume it's already a sequence of identifiers
    field_names = tuple(field_names)

    def __init__(self, *args, **kwargs):
        attrs = dict(zip(self.__slots__, args))
        attrs.update(kwargs)
        for name, value in attrs.items():
            setattr(self, name, value)

    def __iter__(self):
        for name in self.__slots__:
            yield getattr(self, name)

    def __repr__(self):
        values = ', '.join('{}={!r}'.format(*i) for i
                           in zip(self.__slots__, self))
        return '{}({})'.format(self.__class__.__name__, values)

    cls_attrs = dict(__slots__ = field_names,
                     __init__  = __init__,
                     __iter__  = __iter__,
                     __repr__  = __repr__)

    return type(cls_name, (object,), cls_attrs)
>>> Dog = record_factory('Dog', 'name weight owner')
>>> rex = Dog('Rex', 30, 'Bob')
>>> rex
Dog(name='Rex', weight=30, owner='Bob')
>>> Dog.__mro__
(<class 'factories.Dog'>, <class 'object'>)
Note that type is actually a class instead of a function:
type(obj): constructs a class which equals toobj.__class__type(name, bases, dict): constructs a class following that- the
namestring is the class name and becomes the__name__attribute; - the
basestuple itemizes the base classes and becomes the__bases__attribute; - and the
dictdictionary is the namespace containing definitions for class body and is copied to a standard dictionary to become the__dict__attribute
- the
For example, the following two statements create identical type objects:
class X:
    a = 1

# ----- IS EQUIVALENT TO ----- #

X = type('X', (object,), dict(a=1))
A more complicated example:
MyClass = type('MyClass',
               (MySuperClass, MyMixin),
               {'x': 42, 'x2': lambda self: self.x * 2})

# ----- IS EQUIVALENT TO ----- #

class MyClass(MySuperClass, MyMixin):
	x = 42

	def x2(self):
		return self.x * 2
Instances of classes created by record_factory have a limitation: they are not serializable–that is, they can’t be used with the dump/load functions from the pickle module. Solving this problem is beyond the scope of this example, which aims to show the type class in action in a simple use case. For the full solution, study the source code for collections.nameduple; search for the word “pickling.”
21.2 A Class Decorator for Customizing Descriptors
When we left the LineItem example in “LineItem Take #5: A New Descriptor Type” , the issue of descriptive storage names was still pending: the value of attributes such as weight was stored in an instance attribute named _Quantity#0, which made debugging a bit hard.
But once the whole class is assembled and the descriptors are bound to the class attributes, we can inspect the class and set proper storage names to the descriptors. That can be done with a class decorator or a metaclass. We’ll do it first in the easier way.
def entity(cls):
    for key, attr in cls.__dict__.items():
        if isinstance(attr, Validated):
            type_name = type(attr).__name__
            attr.storage_name = '_{}#{}'.format(type_name, key)
    return cls

@entity
class LineItem:
    description = model.NonBlank()
    weight = model.Quantity()
    price = model.Quantity()

    def __init__(self, description, weight, price):
        self.description = description
        self.weight = weight
        self.price = price

    def subtotal(self):
        return self.weight * self.price
21.3 What Happens When: Import Time Versus Runtime
Python programmers talk about import time versus runtime but the terms are not strictly defined and there is a gray area between them.
At import time, the interpreter parses the source code of a .py module in one pass from top to bottom, and generates the bytecode to be executed. That’s when syntax errors may occur. If there is an up-to-date .pyc file available in the local __pycache__, those steps are skipped because the bytecode is ready to run.
In particular, the import statement is not merely a declaration (Contrast with the import statement in Java, which is just a declaration to let the compiler know that certain packages are required.) but it actually runs all the top-level code of the imported module when it’s imported for the first time in the process–further imports of the same module will use a cache, and only name binding occurs then. That top-level code may do anything, including actions typical of “runtime”, such as connecting to a database. That’s why the border between “import time” and “runtime” is fuzzy.
On intepreter parsing a def statement:
- If it is a function, the interpreter compiles the function body (if it’s the first time that module is imported), and binds the function object to its global name, but it does not execute the body of the function, obviously.
- In the usual case, this means that the interpreter defines top-level functions at import time, but executes their bodies only when–and if–the functions are invoked at runtime.
- If it is a class, the story is different: at import time, the interpreter executes the body of every class, even the body of classes nested in other classes. Execution of a class body means that the attributes and methods of the class are defined, and then the class object itself is built. In this sense, the body of classes is “top-level code”: it runs at import time.
21.4 Metaclasses 101
A metaclass is a class factory, except that instead of a function, like record_factory, a metaclass is written as a class.
Consider the Python object model: classes are objects, therefore each class must be an instance of some other class. By default, Python classes are instances of type. In other words, type is the metaclass for most built-in and user-defined classes.
>>> 'spam'.__class__
<class 'str'>
>>> str.__class__
<class 'type'>
>>> type.__class__
<class 'type'>
To avoid infinite regress, type is an instance of itself, as the last line shows.
Note that I am not saying that str inherits from type. What I am saying is that str is a instance of type. str is a subclass of object.

The classes object and type have a unique relationship: object is an instance of type, and type is a subclass of object. This relationship is “magic”: it cannot be expressed in Python because either class would have to exist before the other could be defined.
Every class is an instance of type, directly or indirectly, but only metaclasses are also subclasses of type. That’s the most important relationship to understand metaclasses: a metaclass, such as ABCMeta, inherits from type the power to construct classes.

Let’s see how class Bar(metaclass=Foo) works:
class Foo(type):
    def __new__(cls, name, base, dic):
        print("[Foo] Calling __new__: cls = {}, name = {}, base = {}, dic = {}".format(cls, name, base, dic))
        # return type(name, base, dic)
        return type.__new__(Foo, name, base, dic)

    def __init__(cls, name, base, dic):
        print("[Foo] Calling __init__: cls = {}, name = {}, base = {}, dic = {}".format(cls, name, base, dic))

class Bar(metaclass=Foo):
    print("[Bar] Running class top-level")
    pass

class Baz(Bar):  # NOT EQUIVALENT TO class Baz(metaclass=Bar)
    print("[Baz] Running class top-level")
    pass
When you import these 3 classes (just import, at import time), the output would be:
[Bar] Running class top-level
[Foo] Calling __new__: cls = <class '__main__.Foo'>, name = Bar, base = (), dic = {'__qualname__': 'Bar', '__module__': '__main__'}
[Foo] Calling __init__: cls = <class '__main__.Bar'>, name = Bar, base = (), dic = {'__qualname__': 'Bar', '__module__': '__main__'}
[Baz] Running class top-level
[Foo] Calling __new__: cls = <class '__main__.Foo'>, name = Baz, base = (<class '__main__.Bar'>,), dic = {'__qualname__': 'Baz', '__module__': '__main__'}
[Foo] Calling __init__: cls = <class '__main__.Baz'>, name = Baz, base = (<class '__main__.Bar'>,), dic = {'__qualname__': 'Baz', '__module__': '__main__'}
So you see a Foo instance is created through __new__ and then __init__ on declaring class Bar and Baz (AFTER the “class top-level” gets exectuted).
Note that if Foo.__new__() did not return an instance of Foo, e.g. return type(name, base, dic) as in the comment, Foo.__init__() would not be invoked. Further, declaring class Baz would not require the creation of another instance of Foo because Baz’s actual metaclass is now type.
注意 class Bar(metaclass=Foo) 是指定元类型,class Bar(Foo) 是继承,本质上并不相同!
注意执行顺序!Python Documentation: 3.3.3.1. Metaclasses says:
By default, classes are constructed using
type(). The class body is executed in a new namespace and the class name is bound locally to the result oftype(name, bases, namespace).
所以是先执行 class body 再绑定 class,这也就解释了为什么 “class top-level” 先执行,Foo 对象的创建后执行。
注意 metaclass 的继承!Python Documentation: 3.3.3.2. Determining the appropriate metaclass says:
The appropriate metaclass for a class definition is determined as follows:
- if no bases and no explicit metaclass are given, then
type()is used- if an explicit metaclass is given and it is not an instance of
type(), then it is used directly as the metaclass- if a) an explicit metaclass is given and it is an instance of
type(), or b) bases are defined, then the most derived metaclass is used
21.5 A Metaclass for Customizing Descriptors
class EntityMeta(type):
	"""Metaclass for business entities with validated fields"""

	def __init__(cls, name, bases, attr_dict):
		super().__init__(name, bases, attr_dict)
		for key, attr in attr_dict.items():
			if isinstance(attr, Validated):
				type_name = type(attr).__name__
				attr.storage_name = '_{}#{}'.format(type_name, key)

class Entity(metaclass=EntityMeta):
    """Business entity with validated fields"""

class LineItem(Entity):
	description = NonBlank()
	weight = Quantity()
	price = Quantity()

	def __init__(self, description, weight, price):
		self.description = description
		self.weight = weight
		self.price = price

	def subtotal(self):
		return self.weight * self.price
注意执行顺序!首先 “class top-level” 执行,所以 description = NonBlank(); weight = Quantity(); price = Quantity() 这三句先跑,然后再绑定 metaclass=EntityMeta,开始跑 EntityMeta.__init__,从而可以去修改 storage_name
21.6 The Metaclass __prepare__ Special Method (only available in Python 3)
Python Documentation: 3.3.3.1. Metaclasses says:
When a class definition is executed, the following steps occur:
- the appropriate metaclass is determined
- the class namespace is prepared ★
- the class body is executed
- the class object is created
如果是 class Bar(metaclass=Foo), 那么 Bar 的 namespace 的创建过程可以大致写成:
if Foo.__prepare__:
	Bar.namespace = Foo.__prepare__(name, bases, **kwds)  # `__prepare__` is `@classmethod` decorated
else:
	Bar.namespace = collections.OrderedDict()  # an empty ordered mapping
The __prepare__ method is invoked by the interpreter before the __new__ method in the metaclass to create the mapping that will be filled with the attributes from the class body. Besides the metaclass as first argument, __prepare__ gets the name of the class to be constructed and its tuple of base classes, and it must return a mapping, which will be received as the last argument by __new__ and then __init__ when the metaclass builds a new class.
21.7 Classes as Objects
Every class has a number of attributes defined in the Python data model:
cls.__mro__cls.mro():- When building
cls, the interpreter calls this method to obtain the tuple of superclasses that is stored incls.__mro__. - A metaclass can override this method to customize the method resolution order of the class under construction.
- When building
cls.__class__cls.__name__cls.__bases__: The tuple of base classes of the class.cls.__qualname__: A new attribute in Python 3.3 holding the qualified name of a class or function, which is a dotted path from the global scope of the module to the class definition.cls.__subclasses__():- This method returns a list of the immediate subclasses of the class.
- The implementation uses weak references to avoid circular references between the superclass and its subclasses–which hold a strong reference to the superclasses in their
__bases__attribute. - The method returns the list of subclasses that currently exist in memory.
21.8 Advices on Metaclasses
In the real world, metaclasses are used in frameworks and libraries that help programmers perform, among other tasks:
- Attribute validation
- Applying decorators to many methods at once
- Object serialization or data conversion
- Object-relational mapping
- Object-based persistency
- Dynamic translation of class structures from other languages
Metaclasses are challenging, exciting, and–sometimes–abused by programmers trying to be too clever. To wrap up, let’s recall Alex Martelli’s final advice from his essay “Waterfowl and ABCs”:
And, don’t define custom ABCs (or metaclasses) in production code… if you feel the urge to do so, I’d bet it’s likely to be a case of “all problems look like a nail”-syndrome for somebody who just got a shiny new hammer–you (and future maintainers of your code) will be much happier sticking with straightforward and simple code, eschewing such depths.
-- Alex Martelli
Comments